记录了学习《Programming Rust》笔记。
Chapter 3. Fundamental Types
- Rust有类型推断
- 函数可以是泛型的
Rust的类型
| Type | Description |
|---|---|
| i8,i16,i32,i64,i128,u8,u16,u32,u64,u128 | |
| isize,usize | |
| f32,f64 | |
| bool | |
| char | |
| (char, u8, i32) | 元组 |
| () | |
struct S { x: f32, y:f32 } | 结构体 |
struct T (i32, char); | Tuple-like struct |
struct E; | Unit-like struct; has no fields |
enum Attend { OnTime, Late(u32) } | |
Box<Attend> | |
| &i32,&mut i32 | |
| String | |
| &str | |
| [f64; 4], [u8; 256] | |
Vec<f64> | |
| &[u8], &mut [u8] | |
| Option<&str> | |
| Result<u64, Error> | |
| &dyn Any, &mut dyn Read | |
| fn(&str) -> bool | |
| (Clousure types have no written form) | Clousure |
Fixed-Width Numerical Types
如果需要任意精度表示的一些数值,可以查看 num 包。
Integer Types
不像C和C++,Rust将字符看作是和数值不同的类型,一个 char 不是 u8,也不是 u32(尽管字符是32位长的)。
Rust要求数组的索引必须是 usize 类型的值。
在Rust整数可以带一个后缀来表示它们的类型,比如42u8。如果没有给整数指定具体的类型,Rust会将值存放在一个特定的类型中,传给函数期望的参数,比较另一个有别的特定类型的值,最后,如果有多个可能,而 i32是其中一个的话,就默认是 i32类型,否则就会报错。
前缀0x,0o和0b表示十六进制、八进制和二进制。
为了更清楚地表示很长的数字,还可以给数字加下划线,比如4_294_967_295。有前缀和后缀的数字依然可以加下划线。
尽管Rust中数字和字符是不同的类型,但是也提供了 字节字面量( byte literals),即用类字符字面量表示u8值:b'X'代表的ASCII编码的字符X,它是一个u8值。比如,由于字符A的ASCII编码是65,因此b'A'等价于65u8。字节字面量中只能出现在ASCII编码的字符。
特殊的ACSII编码的字符
| Character | Byte literal |
|---|---|
| 单引号 | b'\'' |
| 反斜杠 | b'\\' |
| 换行 | b'\n' |
| 回车 | b'\r' |
| 制表符 | b'\t' |
对于一些ASCII编码的字符可以用十六进制来表示,这样更容易阅读。比如b'\x1b'。
整数类型之间转换可以用 as 操作符。比如 10_i8 as u16。
整数的一些方法,参见 std::i32。
| |
看下面这段代码
| |
这里没有给出数值的类型,是不是默认 i32 呢?但其实会报错:
| |
为什么会这样子呢?因为Rust想要在调用一个类型自己的方法之前明确地知道一个值的整数类型。i32 的默认值仅适用于在所有方法调用都已解决后类型仍然不明确的情况,在这里就太晚了,因此会报错。换句话说,就是这里我要先调用 abs()方法,这个时候需要确定类型,还没等推断出默认类型,就已经报错了。解决方案:
| |
注意方法调用会发生在一元前缀操作符之前,所以处理负数的时候要当心。比如-4_i32.abs(),这里没有括号,会先调用函数4_i32.abs(),然后再取负号,最终结果为-4。
Checked, Wrapping, Saturating, and Overflowing Arithmetic
在Debug模式下,如果整数数值操作溢出,会报错。但是在发布模式构建的时候,会 wraps。
In a release build, the operation wraps around: it produces the value equivalent to the mathematically correct result modulo the range of the value. (In neither case is overflow undefined behavior, as it is in C and C++.)
上述是默认的,如果这不是你想要的,可以调用一些方法,主要有四类。
- Checked operations return an Option of the result: Some(v) if the mathematically correct result can be represented as a value of that type, or None if it cannot.
- Wrapping operations return the value equivalent to the mathematically correct result modulo the range of the value.
- Saturating operations return the representable value that is closest to the mathematically correct result. In other words, the result is “clamped” to the maximum and minimum values the type can represent.
- Overflowing operations return a tuple (result, overflowed), where result is what the wrapping version of the function would return, and overflowed is a bool indicating whether an overflow occurred.
| Operation | Name suffix | Example |
|---|---|---|
| Addition | add | 100_i8.checked_add(27) == Some(127) |
| Subtraction | sub | 10_u8.checked_sub(11) == None |
| Multiplication | mul | 128_u8.saturating_mul(3) == 255 |
| Division | div | 64_u16.wrapping_div(8) == 8 |
| Remainder | rem | (-32768_i16).wrapping_rem(-1) == 0 |
| Negation | neg | (-128_i8).checked_neg() == None |
| Absolute value | abs | (-32768_i16).wrapping_abs() == -32768 |
| Exponentiation | pow | 3_u8.checked_pow(4) == Some(81) |
| Bitwise left shift | shl | 10_u32.wrapping_shl(34) == 40 |
| Bitwise right shift | shr | 40_u64.wrapping_shr(66) == 10 |
Floating-Point Types
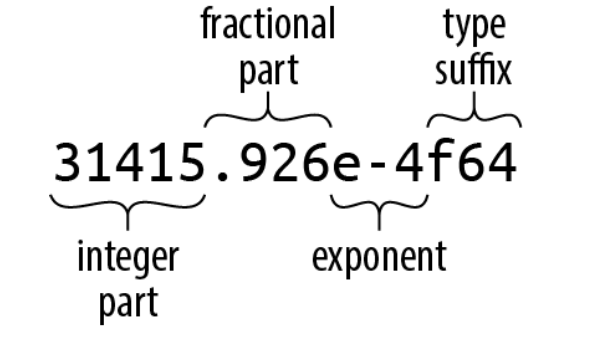
整数部分后的分数部分,指数或者类型后缀至少包含一个,来区别于整数字面量。5.整数部分之后只有一个小数点,也是一个有效的浮点数常数。
浮点数默认类型是 f64 。
为了类型推断的目的,Rust中整数和浮点数之间不会进行相互推断。
f32和f64都有一些特殊值,如 INFINITY,NEG_INFINITY,NAN(that not-a-number value),MIN和MAX。
std::f32::consts和std::f64::consts提供一些数学常量。
Rust是没有数值的隐式转换的,所以如果传入的参数类型和函数的参数类型不一致,这里不会发生隐式转换,因此会报错。想要转换只能显式地用 as 操作符。
The bool Type
在Rust中,bool类型的值为 true 和 false。
Rust中在要求一个Boolean值的上下文中是非常严格的。控制结构if和while要求条件必须是 bool 表达式, 短路逻辑操作符 && 和 || 也要求必须是 bool 表达式。必须 if x!= 0 { ... }这样写,而不能简单地写为 if x { ... }。
Rust可以用 as 操作符将 bool 值转换为数字,但是不能反过来将数值转换为 bool 值。
| |
虽然可以只有一位就表示 bool 值,但是Rust底层用一整个字节来存储 bool 值,这样的话就可以创建一个指针来指向它。
Characters
char 类型表示单个Unicode字符,占 32 位。
字符可以用十六进制来表示或者\u{}来表示。
- 如果字符编码在ASCII编码范围内,可以用十六进制。例如
'\xHH'。 - 也可以用
\u{}来表示任何的Unicode编码字符。例如'\u{HHHHHH}'。
字符必须在有效的 Unicode 码点范围内。
char 和其他类型之间没有隐式地转换。当然可以显式用 as 操作符将 char 类型转换成一个整数类型,如果类型小于32位,会进行截断。相反地,只有 u8 类型能用 as 操作符显式地转换为 char 类型。这一点也很自然,Rust要保证可靠,其他数值类型转换成 char 类型时,可能是无效的字符。不过std::char::from_u32可以将任何 u32 类型的值转换,返回的是 Option<char>。
char(primitive type)文档有相关的方法。
Tuples
元组可以将不同类型的值组合在一起,可以用在返回多个不同类型的值的函数中。
用 a.0可以来获取具体的元素。
元组的索引必须是常数,不可以是变量,比如t[i]或者t.i就是错误的。
可以用模式匹配得到元组对应的值。在指定变量值或者函数返回多个值时很有用。用元组来表示相关的变量是很清晰的,比如宽和高,可以用一个元组把它们放在一起,语义更加清晰。
unit type ()可以用于函数的返回类型,表示什么也不返回。
可以在元组的最后加上逗号,容易看出列表删除或添加了元素。如果是单个值,("lonely hearts",)相比 ("lonely hearts")更加清晰,可以判断是元组而不是括号表达式。
Pointer Types
References
&x 产生了对 x 的一个引用,用Rust的术语来说是向 x 借了一个引用。
在Rust中,引用始终不为空。Rust会跟踪值的所有权和生命周期,在编译时期会检查出悬垂指针,二次释放以及指针无效的错误。
- & T:不可变的共享引用
- &mut T:可变的独占引用
将不可变引用和可变引用看作单个读-写者和多个读者。
Boxes
用于堆分配的指针类型。
| |
Raw Pointers
- *const T
- *mut T
只能在 unsafe 块中对原始指针解引用。
Arrays, Vectors, and Slices
有三种类型表示内存中连续的一块数据。
[T; N]表示数组。数组的长度必须要在编译时期就确定。Vec<T>表示 T 类型的向量。动态分配的,元素存放在堆上。&[T]和&mut [T]称为 T 的共享切片或可变切片。可以把切片看作是一个胖指针,指向第一个元素,同时还包含可以访问到的元素的个数。
一些方法:
v.len()返回元素的个数。v[i]表示 v 的第 i 个元素,注意这里索引 i 必须是 usize 类型的。Rust总是会去检查 i 有没有在有效的范围内。
Arrays
直接用方括号生成数组,或者[T; N]生成数组,Rust不提供未初始化的数组。
数组的长度必须在编译时就确定,不可以用变量,比如[true; n] 这就是错误的。如果想在运行期间获得数组的长度,应该用向量。
在调用一些数组的方法时,Rust会隐式地将一个数组的引用转换为切片,这样可以直接在一个数组上使用任何切片的方法。
| |
关于这一点,官方文档是这样说的。
数组强制转换为
slices ([T]),因此可以在数组上调用 slice 方法。实际上,这提供了用于处理数组的大多数 API。 切片具有动态大小,并且不强制转换为数组。
Vectors
在堆上分配的容器。
可以用 vec!或者Vec::new()来生成新的 vector。
可以动态添加元素:
| |
可以用重复表达式来创建 vector:
| |
迭代器构造:
| |
和数组一样,向量也会在调用一些方法时隐式地转换为切片类型。
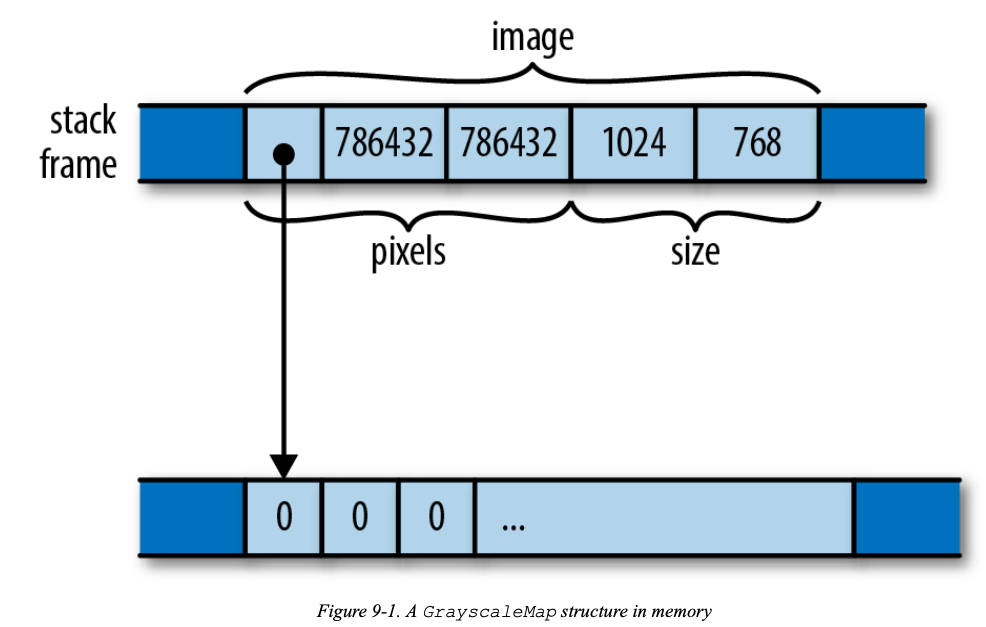
一个 Vec<T> 包含三个值:指向元素的堆 buffer 的指针,这个是被 Vec<T> 所创建和拥有的; buffer 中的容量;包含元素的个数,也就是长度。
知道向量的容量,可以用Vec::with_capacity来创建。提升效率,减少重新分配空间。
capacity方法返回向量不需要再分配时向量的容量。
一些方法:
- insert
- remove
- pop
可以用 for 在向量上进行迭代。
Slices
切片,直接指向引用的数据,看作一个胖指针,指向第一个元素,以及包含 len。
String Types
String Literals
字符串字面量在双引号内。
| |
Byte Strings
带有 b 前缀的是一个字节字面量。
| |
Strings in Memory
内存中以UTF-8编码存储。
| |
内存布局:
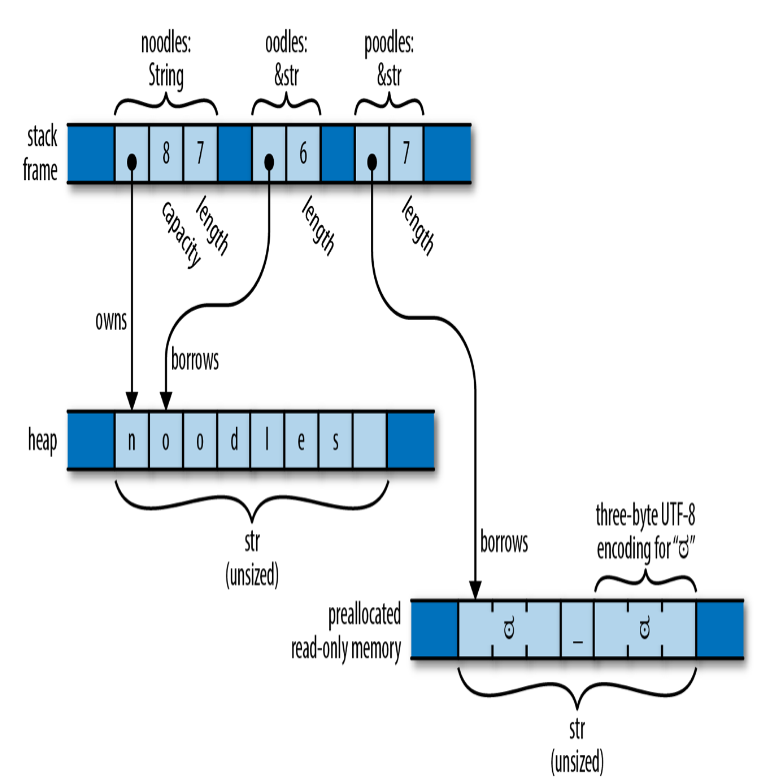
String
&str像&[T],而 String像Vec<T>。
创建 String:
| |
Using Strings
Strings support the == and != operators. Two strings are equal if they contain the same characters in the same order (regardless of whether they point to the same location in memory).
Other String-Like Types
- Stick to String and &str for Unicode text.
- When working with filenames, use std::path::PathBuf and &Path instead.
- When working with binary data that isn’t UTF-8 encoded at all, use
Vec<u8>and &[u8]. - When working with environment variable names and command-line arguments in the native form presented by the operating system, use OsString and &OsStr.
- When interoperating with C libraries that use null-terminated strings, use std::ffi::CString and &CStr.
Type Aliases
类型别名用 type :
| |
Chapter 4. Ownership and Moves
管理内存,想达到的效果:
- 当我们选择一个时间时,内存可以及时释放
- 内存释放后,不再有指针指向它
目前的内存管理方案:
- GC,垃圾回收。解决了悬垂指针的问题,但是会出现世界停时,也就是我们期望释放内存的时候,它还没有释放。
- 自己完全控制内存,比如C和C++。但是对程序员要求高,使用不当有时也会发生错误。
Rust是怎么解决这个问题的呢?秘密武器就是限制你的程序对指针的使用。给的这些限制会保证安全,但也不会丧失自由度。书中这样写道:
Rust’s radical wager, the claim on which it stakes its success and that forms the root of the language, is that even with these restrictions in place, you’ll find the language more than flexible enough for almost every task and that the benefits—the elimination of broad classes of memory management and concurrency bugs—will justify the adaptations you’ll need to make to your style. The authors of this book are bullish on Rust exactly because of our extensive experience with C and C++. For us, Rust’s deal is a no-brainer.
Ownership
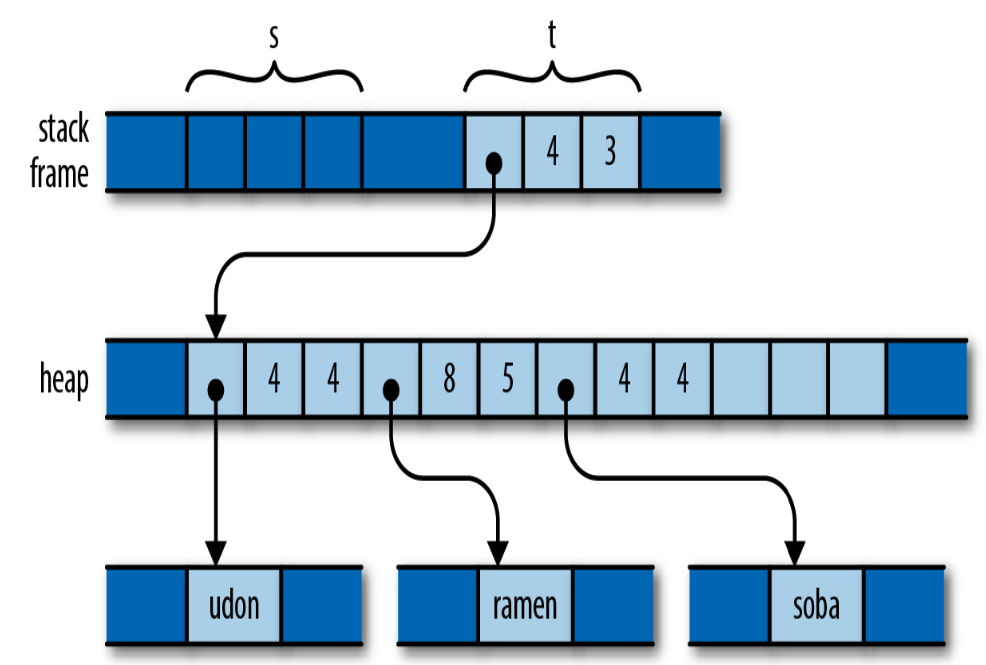
在Rust中,所有权的概念是内建在语言中的,并且会通过编译器检查强制执行。每个值都有一个所有者,这个所有者决定它的生命周期。当所有者被释放时,它所拥有的值也会被释放。
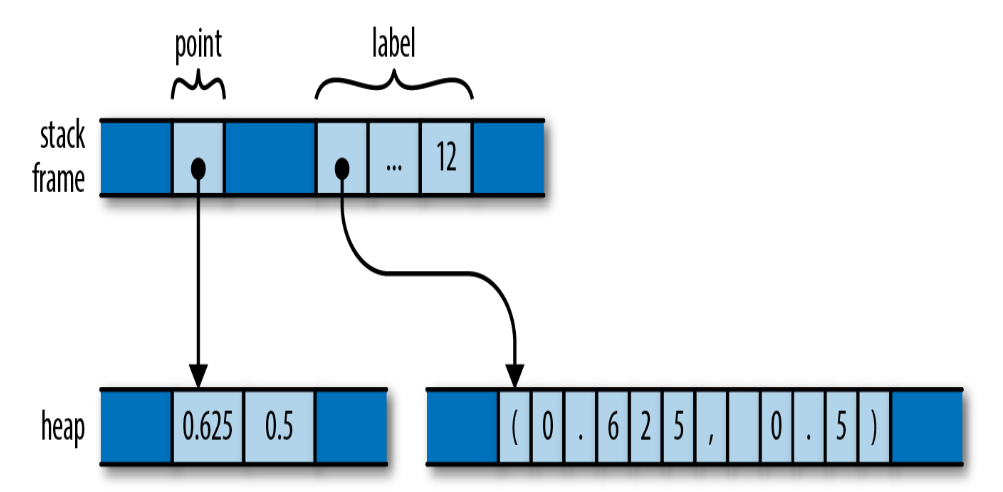
| |
内存布局:
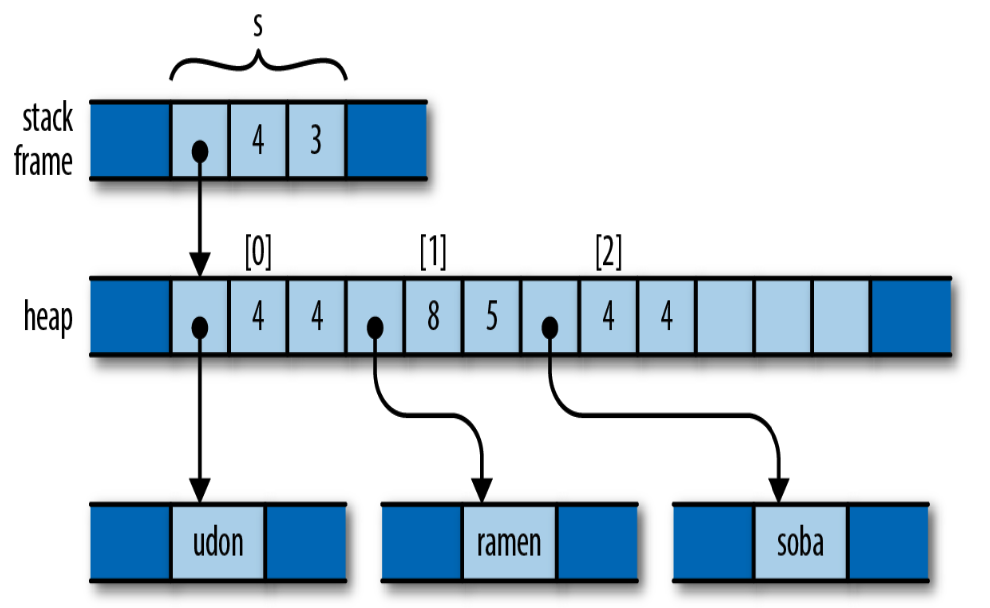
像变量会拥有它的值,结构体会拥有它们的字段,元组、数组以及向量会拥有它们的元素。
再看一个复杂的例子:
| |
内存布局:
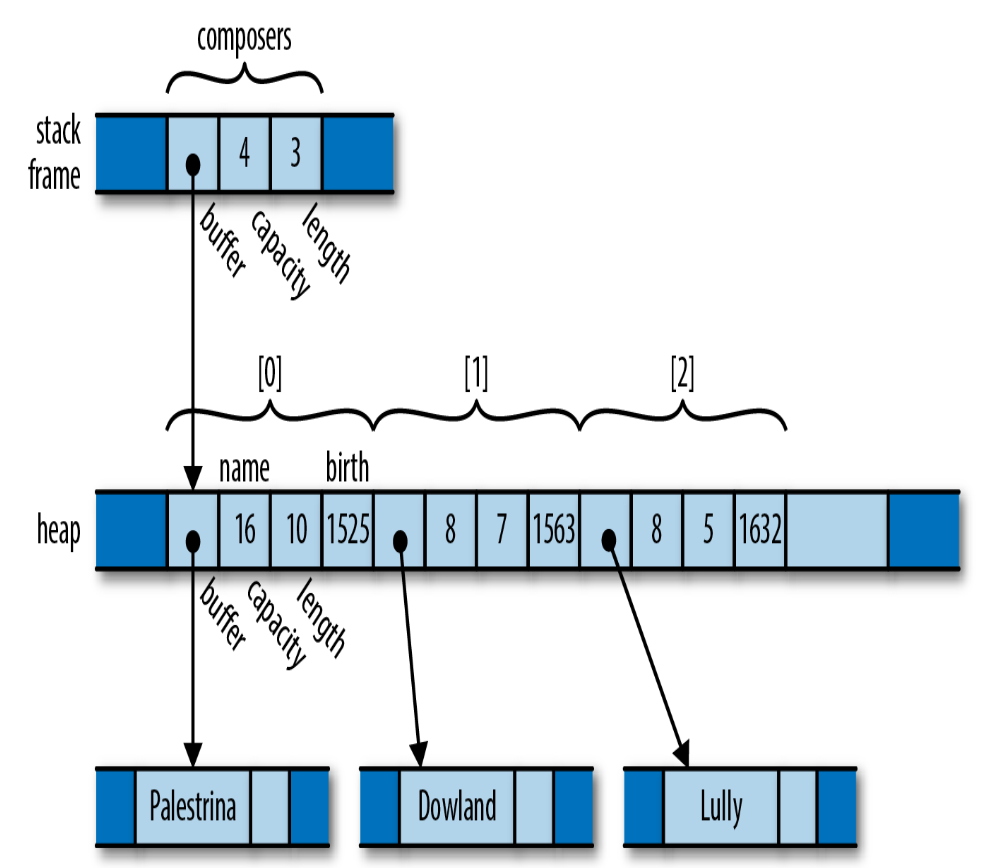
每个值都有一个单独的所有者,这个所有者很容易来决定什么时候 drop 它所拥有的值。但是一个单独的值可能会拥有很多其他的值,如上面这个例子中的向量 composers。所有者和它们所拥有的值会形成一个树。在每个树的根部是一个变量,当这个变量离开它的作用范围,整棵树也会跟着离开。
Rust通常不会显式地 drop 它的值,而是通过:离开变量的作用域,从向量中删除一个元素,或者其他的。
Rust怎么在这些严格的限制下实现灵活性呢?如下列出了一些方式:
- You can move values from one owner to another. This allows you to build, rearrange, and tear down the tree.
- Very simple types like integers, floating-point numbers, and characters are excused from the ownership rules. These are called Copy types.
- The standard library provides the reference-counted pointer types Rc and Arc, which allow values to have multiple owners, under some restrictions.
- You can “borrow a reference” to a value; references are non-owning pointers, with limited lifetimes.
Moves
In Rust, for most types, operations like assigning a value to a variable, passing it to a function, or returning it from a function don’t copy the value: they move it. The source relinquishes ownership of the value to the destination and becomes uninitialized; the destination now controls the value’s lifetime. Rust programs build up and tear down complex structures one value at a time, one move at a time.
看看Python中的变量赋值。
| |
开始的内存布局:
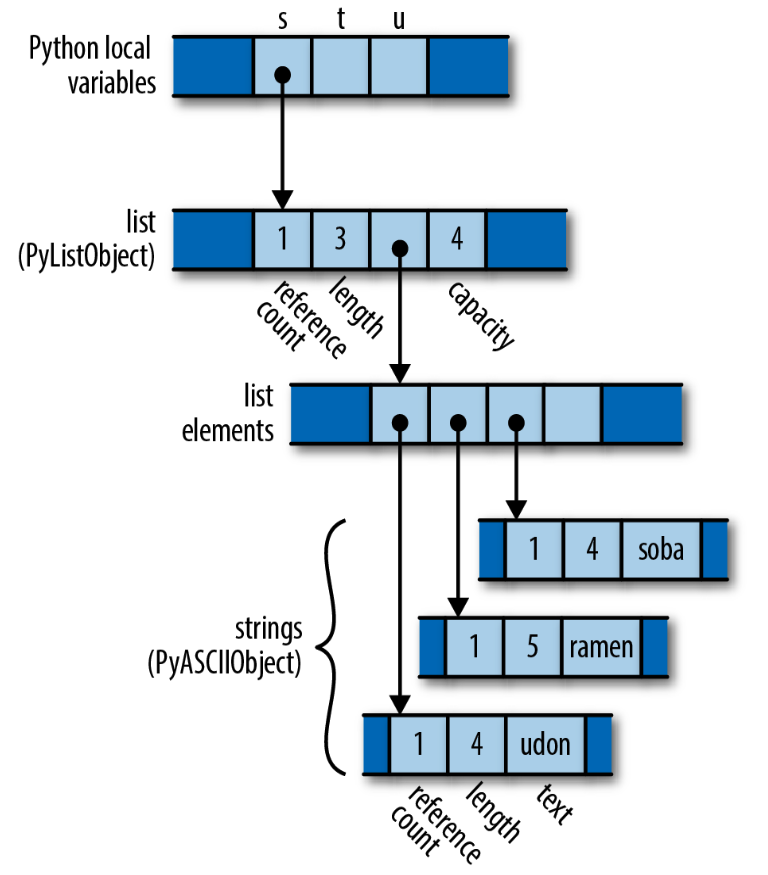
执行代码后的内存布局:
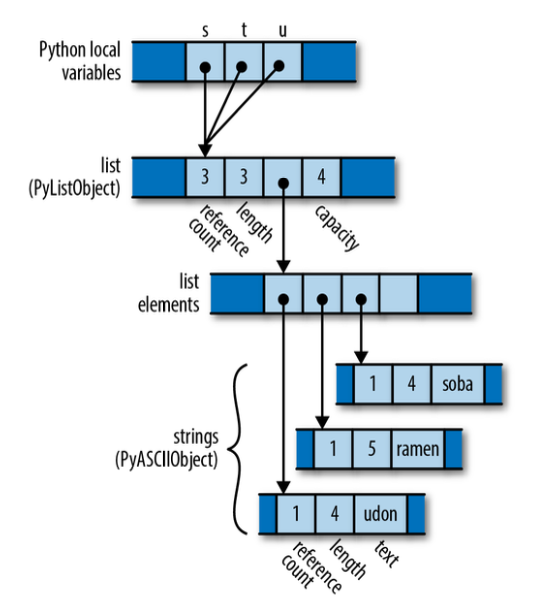
Python has copied the pointer from s into t and u and updated the list’s reference count to 3. Assignment in Python is cheap, but because it creates a new reference to the object, we must maintain reference counts to know when we can free the value.
来看看C++中的实现:
| |
开始的内存布局

代码执行后的内存布局:
Depending on the values involved, assignment in C++ can consume unbounded amounts of memory and processor time. The advantage, however, is that it’s easy for the program to decide when to free all this memory: when the variables go out of scope, everything allocated here gets cleaned up automatically.
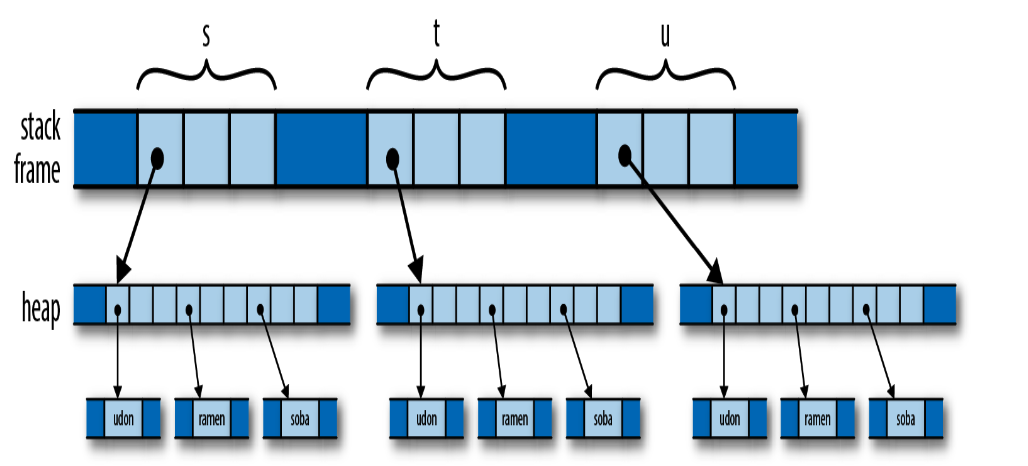
Rust中的实现:
| |
开始的内存分布:
在let t = s;之后,s 的所有权就 move 到 t 上了。
这时 s 变成未初始化状态,再执行 let u = s; 就会报错,因为使用了未初始化的变量。
Consider the consequences of Rust’s use of a move here. Like Python, the assignment is cheap: the program simply moves the three-word header of the vector from one spot to another. But like C++, ownership is always clear: the program doesn’t need reference counting or garbage collection to know when to free the vector elements and string contents.
如果想实现Python那样的引用计数,可以用 Rc 和 Arc,如果想实现C++那样的深拷贝,可以显式调用 clone() 方法。
More Operations That Move
move语义的发生:
- 给一个函数传递参数,会将所有权给参数
- 从函数返回一个值会将所有权给调用者
- 创建一个元组,会将值的所有权给元组
Moving values around like this may sound inefficient, but there are two things to keep in mind. First, the moves always apply to the value proper, not the heap storage they own. For vectors and strings, the value proper is the three-word header alone; the potentially large element arrays and text buffers sit where they are in the heap. Second, the Rust compiler’s code generation is good at “seeing through” all these moves; in practice, the machine code often stores the value directly where it belongs.
Moves and Control Flow
If it’s possible for a variable to have had its value moved away and it hasn’t definitely been given a new value since, it’s considered uninitialized.
Moves and Indexed Content
We’ve mentioned that a move leaves its source uninitialized, as the destination takes ownership of the value. But not every kind of value owner is prepared to become uninitialized.
| |
要将 vector 看作一个整体,这里不能单独将 v[2] move 出来。如果确实想拿出其中的元素,有下面一些方法:
| |
来看看循环
| |
这里在for循环中,v 的所有权给了for循环,v 就变成未初始化的状态,然后 for 循环分离每一个元素,将所有权给每一个。因为 s 有所有权,就可以在内部修改字符串了。
由于在循环中将 v 的所有权给了循环,因此后面就不能再使用 v 了,下面代码就会报错。
| |
如果想得到结构体中的元素值,可以调用 std::mem::replace方法,将原来的值用None来占位。
| |
Copy Types: The Exception to Moves
Assigning a value of a Copy type copies the value, rather than moving it. The source of the assignment remains initialized and usable, with the same value it had before. Passing Copy types to functions and constructors behaves similarly.
The standard Copy types include all the machine integer and floating-point numeric types, the char and bool types, and a few others. A tuple or fixed-size array of Copy types is itself a Copy type.
Only types for which a simple bit-for-bit copy suffices can be Copy. As a rule of thumb, any type that needs to do something special when a value is dropped cannot be Copy.
自定义的结构体或者枚举类型可以用属性宏实现 Copy trait。
| |
In Rust, every move is a byte-for-byte, shallow copy that leaves the source uninitialized. Copies are the same, except that the source remains initialized.
One of Rust’s principles is that costs should be apparent to the programmer. Basic operations must remain simple. Potentially expensive operations should be explicit, like the calls to clone in the earlier example that make deep copies of vectors and the strings they contain.
Rc and Arc: Shared Ownership
The Rc and Arc types are very similar; the only difference between them is that an Arc is safe to share between threads directly—the name Arc is short for atomic reference count—whereas a plain Rc uses faster non-thread-safe code to update its reference count.
前面的例子用Rust实现Python中引用计数的效果:
| |
内存布局:

Rust’s memory and thread-safety guarantees depend on ensuring that no value is ever simultaneously shared and mutable. Rust assumes the referent of an Rc pointer might in general be shared, so it must not be mutable.
However, Rust does provide ways to create mutable portions of otherwise immutable values; this is called interior mutability. 这可能造成循环引用。
想要用Rc避免循环引用。You can sometimes avoid creating cycles of Rc pointers by using weak pointers, std::rc::Weak, for some of the links instead.
Chapter 5. References
Rust also has non-owning pointer types called references, which have no effect on their referents’ lifetimes.
In fact, it’s rather the opposite: references must never outlive their referents. You must make it apparent in your code that no reference can possibly outlive the value it points to. To emphasize this, Rust refers to creating a reference to some value as borrowing the value: what you have borrowed, you must eventually return to its owner.
References to Values
A reference lets you access a value without affecting its ownership. References come in two kinds:
- A shared reference lets you read but not modify its referent. However, you can have as many shared references to a particular value at a time as you like. The expression
&eyields a shared reference to e’s value; if e has the type T, then &e has the type &T, pronounced “ref T.” Shared references are Copy. - If you have a mutable reference to a value, you may both read and modify the value. However, you may not have any other references of any sort to that value active at the same time. The expression &mut e yields a mutable reference to e’s value; you write its type as &mut T, which is pronounced “ref mute T.” Mutable references are not Copy.
| |
Iterating over a shared reference to a HashMap is defined to produce shared references to each entry’s key and value: artist has changed from a String to a &String, and works from a Vec<String> to a &Vec<String>.
The inner loop is changed similarly. Iterating over a shared reference to a vector is defined to produce shared references to its elements, so work is now a &String. No ownership changes hands anywhere in this function; it’s just passing around non-owning references.
When we pass a value to a function in a way that moves ownership of the value to the function, we say that we have passed it by value. If we instead pass the function a reference to the value, we say that we have passed the value by reference.
Working with References
Rust References Versus C++ References
In Rust, references are created explicitly with the & operator, and dereferenced explicitly with the * operator.
Since references are so widely used in Rust, the . operator implicitly dereferences its left operand, if needed.
| |
The println! macro used in the show function expands to code that uses the . operator.
The . operator can also implicitly borrow a reference to its left operand, if needed for a method call.
| |
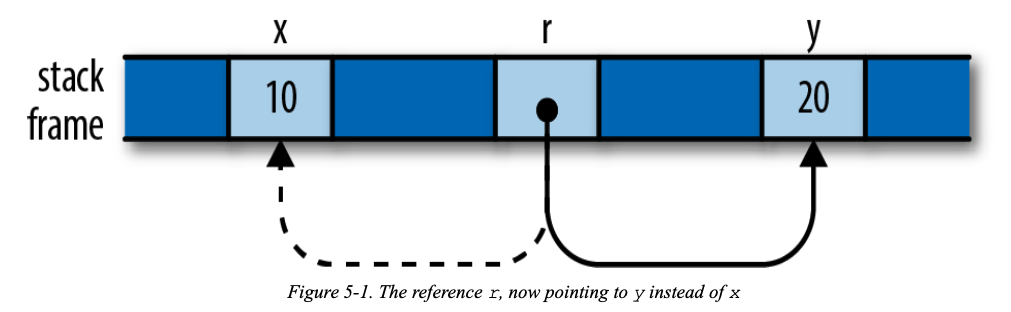
Assigning References
| |
The reference r initially points to x. But if b is true, the code points it at y instead.
References to References
| |
The . operator follows as many references as it takes to find its target.
| |
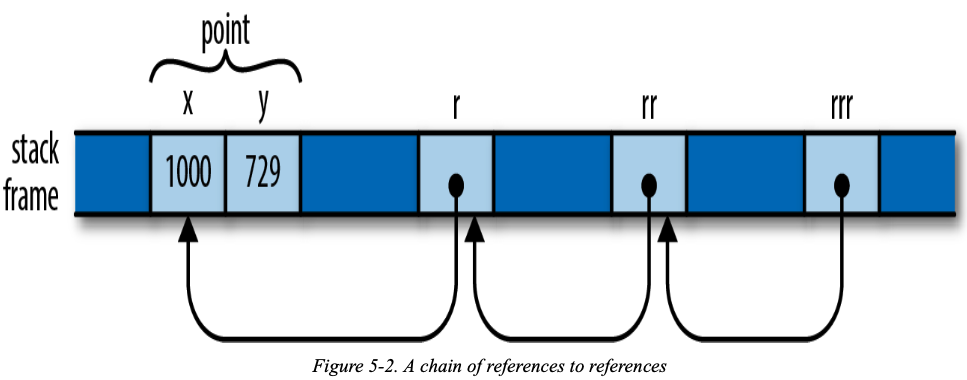
So the expression rrr.y, guided by the type of rrr, actually traverses three references to get to the Point before fetching its y field.
Comparing References
| |
比较操作符和.操作符一样可以解引用到最终的目标值。
可以用std::ptr::eq来比较地址是否相等:
| |
比较操作符两端的类型必须相同:
| |
References Are Never Null
Rust references are never null. There is no default initial value for a reference (you can’t use any variable until it’s been initialized, regardless of its type) and Rust won’t convert integers to references (outside of unsafe code), so you can’t convert zero into a reference.
In Rust, if you need a value that is either a reference to something or not, use the type Option<&T>.
Borrowing References to Arbitrary Expressions
Rust lets you borrow a reference to the value of any sort of expression at all:
| |
Rust simply creates an anonymous variable to hold the expression’s value and makes the reference point to that. The lifetime of this anonymous variable depends on what you do with the reference:
- If you immediately assign the reference to a variable in a let statement (or make it part of some struct or array that is being immediately assigned), then Rust makes the anonymous variable live as long as the variable the let initializes.
- Otherwise, the anonymous variable lives to the end of the enclosing statement.
References to Slices and Trait Objects
fat pointers:
- A reference to a slice is a fat pointer, carrying the starting address of the slice and its length.
- Rust’s other kind of fat pointer is a trait object, a reference to a value that implements a certain trait. A trait object carries a value’s address and a pointer to the trait’s implementation appropriate to that value, for invoking the trait’s methods.
Reference Safety
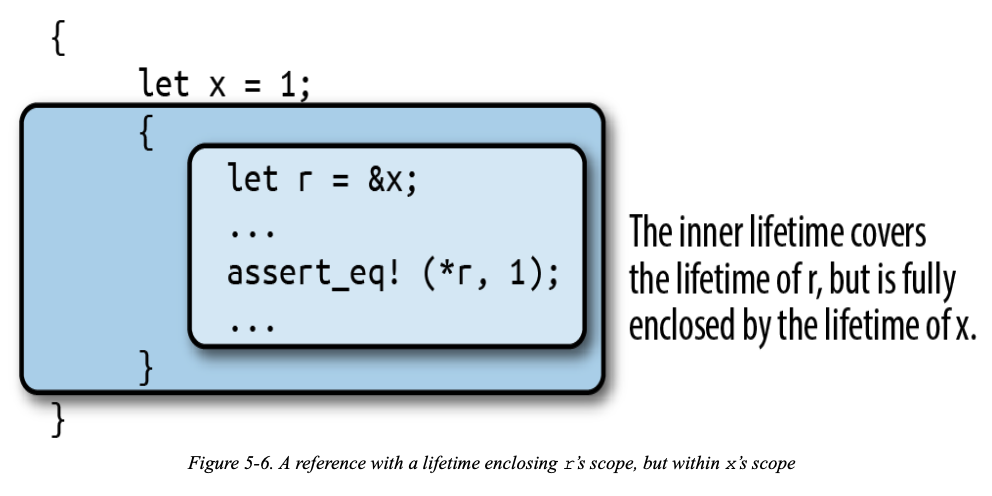
Borrowing a Local Variable
You can’t borrow a reference to a local variable and take it out of the variable’s scope:
| |
The variables r and x both have a lifetime, extending from the point at which they’re initialized until the point that the compiler can prove they are no longer in use. The third lifetime is that of a reference type: the type of the reference we borrow to x and store in r.
We say that the variable’s lifetime must contain or enclose that of the reference borrowed from it. 变量的生命周期必须包含或涵盖从它那里借来的引用的生命期。
Here’s another kind of constraint: if you store a reference in a variable r, the reference’s type must be good for the entire lifetime of the variable, from its initialization until its last us.
We say that the reference’s lifetime must contain or enclose the variable’s. 引用的生命期必须包含或涵盖保存它的变量的生命期。
The first kind of constraint limits how large a reference’s lifetime can be, while the second kind limits how small it can be.
下面的生命周期是正确的:
First, understand the constraints arising from the way the program uses references; then, find lifetimes that satisfy them.
Receiving References as Function Arguments
- Every static must be initialized.
- Mutable statics are inherently not thread-safe (after all, any thread can access a static at any time), and even in single-threaded programs, they can fall prey to other sorts of reentrancy problems. For these reasons, you may access a mutable static only within an unsafe block. In this example we’re not concerned with those particular problems, so we’ll just throw in an unsafe block and move on.
fn f<'a>(p: &'a i32), we’re defining a function that takes a reference to an i32 with any given lifetime ‘a.
In other words, we were unable to write a function that stashed a reference in a global variable without reflecting that intention in the function’s signature. In Rust, a function’s signature always exposes the body’s behavior.
If we do see a function with a signature like g(p: &i32) (or with the lifetimes written out, g<'a>(p: &'a i32)), we can tell that it does not stash its argument p anywhere that will outlive the call.
Passing References to Functions
| |
从g的签名看,Rust知道它不会把p保存到超出调用生命周期的变量里;任何涵盖调用的生命周期都满足'a。
| |
这里 &x不能存活得比x长,而函数签名要求&x活得和&'static一样长,这就无法得到满足,因此报错。
Returning References
| |
如果一个函数只有一个引用作为参数并返回一个引用,则它们拥有相同的生命周期。
Structs Containing References
当引用类型出现在另一个类型的定义中时,必须写出其生命周期。
| |
或者
| |
保存在r中的任何引用的生命周期最好包含'a,而'a也必须比保存在S的任何值都长寿。
The lifetime of any reference you store in r had better enclose ‘a, and ‘a must outlast the lifetime of wherever you store the S.
The assignment s = S { … } stores this S in a variable whose lifetime extends to the end of the example, constraining ‘a to outlast the lifetime of s.
And now Rust has arrived at the same contradictory constraints as before: ‘a must not outlive x, yet must live at least as long as s.
Distinct Lifetime Parameters
| |
如下代码:
| |
If you work through the code carefully, you can follow its reasoning:
- Both fields of S are references with the same lifetime ‘a, so Rust must find a single lifetime that works for both s.x and s.y.
- We assign r = s.x, requiring ‘a to enclose r’s lifetime. (r <= ‘a)
- We initialized s.y with &y, requiring ‘a to be no longer than y’s lifetime. (‘a <= y)
Omitting Lifetime Parameters
三条规则(见生命周期与引用有效性):
第一条规则是每一个是引用的参数都有它自己的生命周期参数。换句话说就是,有一个引用参数的函数有一个生命周期参数:
fn foo<'a>(x: &'a i32),有两个引用参数的函数有两个不同的生命周期参数,fn foo<'a, 'b>(x: &'a i32, y: &'b i32),依此类推。第二条规则是如果只有一个输入生命周期参数,那么它被赋予所有输出生命周期参数:
fn foo<'a>(x: &'a i32) -> &'a i32。第三条规则是如果方法有多个输入生命周期参数并且其中一个参数是
&self或&mut self,说明是个对象的方法(method)(译者注: 这里涉及 Rust 的面向对象参见 17 章), 那么所有输出生命周期参数被赋予self的生命周期。第三条规则使得方法更容易读写,因为只需更少的符号。
Sharing Versus Mutation
Throughout its lifetime, a shared reference makes its referent read-only: you may not assign to the referent or move its value elsewhere.
Shared access is read-only access.
Values borrowed by shared references are read-only. Across the lifetime of a shared reference, neither its referent, nor anything reachable from that referent, can be changed by anything. There exist no live mutable references to anything in that structure, its owner is held read-only, and so on. It’s really frozen.
Mutable access is exclusive access.
A value borrowed by a mutable reference is reachable exclusively via that reference. Across the lifetime of a mutable reference, there is no other usable path to its referent or to any value reachable from there. The only references whose lifetimes may overlap with a mutable reference are those you borrow from the mutable reference itself.
Taking Arms Against a Sea of Objects

Chapter 6. Expressions
Rust中绝大多数都是表达式。
An Expression Language
- 在Rust中,if 和 match 都可以产生值。一个match表达式可以给一个函数或者宏来传参。
- Rust 中没有三元操作符。
- Rust中所有的控制流程工具是表达式。
Precedence and Associativity
- 闭包的优先级在最后。
- All of the operators that can usually be chained are left-associative. 所有这些操作符在链式操作时都具有左关联性。
- 比较操作符,赋值操作符(assignment iperators)以及范围操作符(
..range operators)不能链式链接。
Blocks and Semicolons
- block 的值是最后一个表达式的值。
- let 声明必须要有分号。
- 如果 if 表达式没有 else,那么总是返回 ()。
Declarations
- let 声明必须要有分号。
- let 声明可以只声明变量而不初始化它。
- 在没有初始化一个变量之前是不能使用它的。
- 变量遮蔽,可以是不同的类型。
- 一个块可以包含特性项( item) declarations,就是指任何可以在程序或模块的全局中出现的声明,比如 fn,struct 或者 use。
- 嵌套的 fn 不能使用 scope 中的局部变量。
- 块中甚至可以包含一个完整的模块。
if and match
- if 表达式的 condition 必须是 bool 类型的,Rust 不会将数值或者指针隐式转换成 Boolean 类型。
- 在 if 表达式形式中,围绕条件的圆括号不是必需的。事实上,rustc在发现不必要的圆括号时会给出警告。但花括号是必需的。
- 一个只有 if 没有 else 的表达式相当于有一个 空的else 块。因此如果 if 表达式没有 else,那么总是返回
()。 - 编译器可以用一个跳转表( jump table )来优化 match 表达式。如果 match 的每个分支都产生一个常量值,那么也可以应用同样的优化。此时,编译器会构建一个这些值的数组,而 match 会被编译为对数组的访问。除了边界检查,编译后的代码中根本没有分支。
- Rust 禁止 match 表达式没有覆盖到所有情况。
- 一个 if 表达式的所有块必须产生相同类型的值,对于 match 表达式也是一样的,match 表达式的所有分支也都必须返回相同类型的值。
if let
| |
等价于
| |
Loops
有四种 looping 表达式:
| |
- while 和 for 的值一直都是 (),循环的值是
()。 - 用 loop 可以无限循环,除非遇到 break,return或者线程 panics。
for循环每迭代一个值就会消耗一个值,有时候可以使用引用。
Control Flow in Loops
- break 只能在 loop 中,不能在 match 中。
- 可以给 break 一个表达式,这个表达式的值就是 loop 的值。
- 自然地,所有 break 表达式在一个循环中必须是相同类型的,并且这个类型就是 loop 的类型。
- 循环可以加上生命周期的标签,然后可以 break 这个标签,break 也可以同时带上值表达式。
- 标签同样可以用于 continue。
return Expressions
- return 表达式会退出当前函数,并且给调用者返回一个值。
- 可以将函数体看成一个块表达式。
- return 可以放弃正在运行中的工作。
Why Rust Has loop
Rust编译器分析你的程序的控制流程:
- 检查返回类型
- 检查局部变量不会使用未初始化的值
- 警告不可到达的代码
以上这些称为流敏感(flow-sensitive)分析。
Rust追求简单,其流敏感分析压根不会检查循环条件,而只是假设程序中的任何条件不是true就是false。
! 表示是一个发散函数。比如 break,return,panic!(),无穷循环,std::process::exit() ,它们都不以惯常的方式结束,这些可以跳过之前说的类型一致规则。
Function and Method Calls
.location()方法可能取 player 的值或者引用。.操作符可以自动的解引用player或者借一个引用。可以接收值或引用。- 静态方法
Vec::new(),非静态方法通过值调用:my_vec.len()。 - 对于泛型,函数或者方法调用要用比目鱼 turbofish 操作符,比如:
return Vec::<i32>::with_capcity(1000);
Fields and Elements
点操作符或者方括号的左侧是一个引用或者智能指针,那么它可以被自动地解引用,这样的表达式被称为 lvalues,它们可以出现在一个 assignment 的左侧。
操作符:
| |
Reference Operators
- &
- & mut
*操作符可以用来解引用
Arithmetic, Bitwise, Comparsion, and Logical Operators
- 不能将
-和+用到无符号的数值类型上。 %也可以用在浮点数上。!表示按位非。- 位操作符的优先级高于比较操作符的优先级。
- 比较操作符两端的类型必须都是 bool 类型。
Assignment
- Rust中可以有复合操作符:
+=-=*= - Rust不支持链式 assignment,比如
a = b = 3 - Rust没有自增和自减操作符:
++和--。
Type Casts
可以用 as 进行类型转换。几种类型转换是允许的:
- 任何内置的数值之间可以转换。
- bool、char 或者 C-like enum 类型可以转换为整数。u8 可能转换为 char 类型。
- 有些含有 unsafe 的指针类型的转换也是允许的。
一些自动转换,被称为解引用强制转换(deref coercions):
&String->&str&Vec<i32>->&[i32]&Box[Chessboard]->&Chessboard
它们实现了内置的 Deref trait。
Closures
| |
Rust自动推断类型。调用闭包就像调用一个函数那样:
| |
Onward
表达式只是我们思考 running code。
Chapter 7. Error Handling
Panic
panic 是程序本身出现一个bug。比如:
- 数组越界
- 整数除零
- 对于一个
Result调用.expect()。 - 断言失败
panic时要么展开栈,要么中止程序,展开栈是默认的。
Unwinding
panic发生:
- 终端打印错误信息
- 运行
RUST_BACKTRACE=1会将栈展开。资源会关闭,会调用drop方法。 - 最后,线程退出。
panic不是崩溃,不是未定义行为。panic像Java中的运行时异常,其行为是明确定义的,只是不应该发生而已。
panic是安全的,它不违反任何Rust的安全规则。不会在内存中导致悬空指针或初始化一半的值,Rust展开栈后,进程的其他部分还可以运行。
panic是线程级别的。
有一种方法可以捕获栈展开,运行panic线程存活并继续运行。使用标准库中的std::panic::catch_unwind()函数。
Aborting
- 如果
.drop()方法触发了第二个panic当Rust在第一个panic后尝试 clean up,这会被当作是致命的。Rust会停止展开并且直接终止整个流程。 - 编译加上
-C panic=abort,第一个 panic 就立马终止程序。
Result
如果不使用Result值,会得到一个警告。
Catching Errors
用 match 来处理 error
| |
但是上面这种方式太冗长了。这里有一些方法:
| |
Result Type Aliases
在标准库 std::io 模块中有:
| |
这里用了 type aliases。
Printing Errors
std::io::Error、std::fmt::Error、std::str::Utf8Error等等实现了std::error::Error trait。一些公用的方法:
println!()打印错误,用
{}可以打印简短的错误信息,用{:?}的Debug模式打印出错误。err.to_string()返回错误信息字符串。
err.source()返回一个Option,包含潜在的错误。
| |
想要展开错误,在Rust不稳定版本下,可以使用anyhow包。
Propagating Errors
如果错误发生,我们希望调用者来处理。
| |
?操作符的行为取决于这个函数的返回值:
- 如果是成功结果,那么它会打开Result并取出其中的成功值。
- 如果是错误结果,那么它会立即从闭合函数中返回,将错误结果沿调用链向上传播。
?操作符一样可以使用match表达式实现。
?可以类似地用在Option类型的值上面。In a function that returns Option, you can use ? to unwrap a value and return early in the case of None.
Working with Multiple Error Types
?不能将std::num::ParseIntError转换为std::io::Error类型。- 所有标准库中的错误都可以转成
Box<dyn std::error::Error + Send + Sync + 'static'>类型。
| |
?会调用GenericError::from()方法来进行自动转换。
- 如果想要其中一种特别的错误类型进行处理,其它的错误进行传播的话,可以用泛型方法
error.downcast_ref::<ErrorType>()
Dealing with Errors That “Can’t Happen”
- 当我们不想处理不会发生的错误时,用
.unwrap()方法。 - 也可以用
.expect(message)方法。
Ingoring Errors
| |
用 let _ = ...用来禁止警告。
Handling Errors in main()
- 一般情况下在 main 函数中不能用
?,因为main()函数的返回类型不是Result。 - 最简单的方法是用
.expect()方法。发生错误时会 panic 并且返回一个非零的退出代码。 - 或者可以返回一个
Result类型,这样就能用?,同时用debug{:?}方式打印出错误。
| |
- 或者自己处理相应的错误。用
print_error()方法结合if let打印简介的错误信息。
Declaring a Custom Error Type
- 可以自定义
Error类型,用 struct 实现。Errors 应该实现fmt::Display和std::error::Errortrait。 - 或者直接用
thiserror中的,加上属性宏#[derive(Error)]。
| |
Why Results?
- 在代码中记录错误,对错误做出决定。
- 允许错误传播,传播路径可见。
- 每一个函数都有返回类型,这样更清楚函数可不可能失败。
- Rust 会检查 Result 类型的值是否被使用。
- 因为 Result 是一个数据类型,因此更容易处理一系列成功或者失败的值,也更容易存储。
Chapter 8. Crates and Modules
Crates
Rust programs are made of crates. Each crate is a complete, cohesive unit: all the source code for a single library or executable, plus any associated tests, examples, tools, configuration, and other junk.
要了解包是什么,以及它们如何协作,可以对一个使用了依赖的已有项目运行 cargo build 命令,同时加上 --verbose 标记。
Cargo 的依赖会形成 dependency graph 。
Cargo 会使用 --crate-type lib选项,会告诉 rustc 不要去找 main() 函数,而是生成一个 .rlib 文件,其中包含编译后的代码,可以供以后在创建库或者.rlib文件使用。
When compiling libraries, Cargo uses the – crate-type lib option. This tells rustc not to look for a main() function but instead to produce an .rlib file containing compiled code that can be used to create binaries and other .rlib files.
Cargo使用 --crate-type bin 选项,编译结果将是一个针对目标平台的二进制可执行文件。
运行每个 rustc 命令时,Cargo会通过--extern选项给出当前包用到的每个库的文件名。这样,当rustc看到use image::png::PNGEncoder这行代码时,它就知道到磁盘的什么位置去找这个库编码后的代码了。Rust编译器需要访问.rlib文件,因为其中包含第三方库编译后的代码。Rust会将这些代码静态链接到最终的可执行文件上。.rlib文件也包含类型信息,Rust可以据此检查我们代码中用到的库特性确实在对应的包里存在,从而保证正确地使用它们。这个文件里还包含包的公共内联函数、泛型和宏的一个副本,这些特性直到Rust遇到调用它们的代码时才会编译为机器码。
cargo build --release产生优化代码,优化代码的运行速度更快,但编译时间比较长,而且不会检查整型溢出,还会跳过debug_assert!()断言,另外它们针对 panic 生成的栈追踪信息一般不太可靠。
Editions
To evolve without breaking existing code, Rust uses editions. The 2015 edition of Rust is compatible with Rust 1.0. The 2018 edition changed async and await into keywords, streamlined the module system, and introduced various other language changes that are incompatible with the 2015 edition.
Rust promises that the compiler will always accept all extant editions of the language, and programs can freely mix crates written in different editions. It’s even fine for a 2015 edition crate to depend on a 2018 edition crate. In other words, a crate’s edition only affects how its source code is construed; edition distinctions are gone by the time the code has been compiled. This means there’s no pressure to update old crates just to continue to participate in the modern Rust ecosystem. Similarly, there’s no pressure to keep your crate on an older edition to avoid inconveniencing its users. You only need to change editions when you want to use new language features in your own code.
If you have a crate written in an older edition of Rust, the cargo fix command may be able to help you automatically upgrade your code to the newer edition. The Rust Edition Guide explains the cargo fix command in detail.
Build Profiles
构建分析
| 命令行 | Cargo.toml使用的区块 |
|---|---|
| cargo build | [profile.dev] |
| cargo build –realse | [profile.realse] |
| cargo test | [profile.test] |
想要同时启用优化和调试,可以这样设置:
| |
这里debug设置控制 rustc 中的 -g 选项。有了这个配置,再执行 cargo build --realse,就可以得到一个带有调试符号的二进制文件。优化设置不受影响。
Modules
| |
One function is marked pub(crate), meaning that it is available anywhere inside this crate, but isn’t exposed as part of the external interface. It can’t be used by other crates, and it won’t show up in this crate’s documentation.
Anything that isn’t marked pub is private and can only be used in the same module in which it is defined, or any child modules.
Nested Modules
mod可以嵌套。
It’s also possible to specifypub(super), making an item visible to the parent module only, and pub(in <path>), which makes it visible in a specific parent module and its descendants.
Modules in Separate Files
These three options—modules in their own file, modules in their own directory with a mod.rs, and modules in their own file with a supplementary directory containing submodules—give the module system enough flexibility to support almost any project structure you might desire.
Paths and Imports
用::操作符。
| |
或者用use导入。
| |
一次导入多个模块:
| |
导入时起别名
| |
模块不会自动从自己的父模块继承名字。关键字super是父模块的一个别名,self则是当前模块的一个别名,关键词 crate 表示包含当前模块的包。
| |
使用相对于根的路径,这样当模块移动时,也是有效的。
use super::*可以让子模块获得父模块的私有项。
绝对路径:
| |
The Standard Prelude
Furthermore, a few particularly handy names, like Vec and Result, are included in the standard prelude and automatically imported. Rust behaves as though every module, including the root module, started with the following import:
| |
The standard prelude contains a few dozen commonly used traits and types.
参考std::prelude。
Making use Declarations pub
| |
This means that Leaf and Root are public items of the plant_structures module. They are still simple aliases for plant_structures::leaves::Leaf and plant_structures::roots::Root.
Making Struct Fields pub
| |
Outside the module, only public fields are accessible.
Statics and Constants
| |
A constant is a bit like a C++ #define: the value is compiled into your code every place it’s used. A static is a variable that’s set up before your program starts running and lasts until it exits. Use constants for magic numbers and strings in your code. Use statics for larger amounts of data, or any time you need to borrow a reference to the constant value.
There are no mut constants.
Turning a Program into a Library
The first step is to factor your existing project into two parts: a library crate, which contains all the shared code, and an executable, which contains the code that’s only needed for your existing command-line program.
By default, cargo build looks at the files in our source directory and figures out what to build. When it sees the file src/lib.rs, it knows to build a library. The code in src/lib.rs forms the root module of the library. Other crates that use our library can only access the public items of this root module.
The src/bin Directory
We can keep our program and our library in the same crate, too. Put this code into a file named src/bin/efern.rs:
| |
Because we’ve put this file into src/bin, Cargo will compile both the fern_sim library and this program the next time we run cargo build. We can run the efern program using cargo run –bin efern. Here’s what it looks like, using –verbose to show the commands Cargo is running.
| |
可以将 fern_sim 作为一个单独的项目,然后在 Cargo.toml 上加上依赖。
Attributes
Rust程序中的任何 item 都可以用属性来修饰。
#[allow(non_camel_case_types)]可以不使用驼峰命名法。#[cfg]条件编译#[inline]内联函数。当出现一个函数或者一个方法定义在一个 crate 中,而我们在另一个 crate 中去调用,可以显式使用这个属性。#[inline(always)]要求函数在每一次调用的点都展开内联#[inline(never)]要求一个函数从不进行内联
#[cfg]和#[allow]可以用在一整个模块或者里面的任何东西,但是#[inline]和#[test]只能用在单个项上面。- 想在整个 crate 上面绑定属性,在main.rs
或者lib.rs文件顶部中用#!。#!也可以用在函数,结构体中,但是它只能一贯地用在文件的开头,来绑定给整个模块或者 crate 绑定一个属性。而有的属性总是用#!,因为它只能作用在整个 crate 上,比如#![feature]。 #![feature]用来表示 Rust 语言不稳定的 features,这些是实验性质的。当后面这个 feature 稳定之后,编译器就会警告,建议移除#![feature]。
Tests and Documention
#[test]标记函数,表明这个是测试函数,用cargo test可以测试所有测试函数,如果只想测试某一个,可以用cargo test name来测试具体的函数。assert!(expr):如果表达式为真就通过测试,否则 panic。assert_eq!(v1, v2):判别 v1 和 v2 是否相等。- 如果只想在 debug 模式下检验是否相等,可以用
debug_assert!和debug_assert_eq!。 #[should_panic]表示会 panic。或者返回Result<(), E>。cargo build和cargo build --realse会跳过#[test]测试代码。- 当运行
cargo test,cargo 会编译两次代码。一次是常规的,还有一次是测试程序并启用测试套件。 #[cfg(test)]标记整个模块。- 一般 cargo test 会启用多线程来一次运行多个测试,用
cargo test name和cargo test -- --test-threads 1来限制只用一个线程测试。 cargo test -- --no-capture:也输出那些通过的测试。
Integration Tests
- 集成测试,可以用来测试一些公共的API,站在用户的角度。
- 单独建立一个
tests的文件夹,放在和src同一个路径下,当运行cargo test的时候,集成测试和单元测试都会运行。如果只想运行集成测试,可以用命令cargo test --test unfurl来运行一个具体的集成测试。
Documentation
| |
- –no-deps :只生成自己的文档,不生成所有它依赖的 crates。
- –open:在浏览器中打开文档。
- 生成的文档放在 target/doc 目录下。
///的文档注释类似#[doc]属性。而//!和#![doc]一样。- 文档注释中markdown 的链接也可以链接到相应代码的文档。
- One special feature of doc comments in Rust is that Markdown links can use Rust item paths, like leaves::Leaf, instead of relative URLs, to indicate what they refer to.
| |
You can also add search aliases to make it easier to find things using the built-in search feature.
| |
文档中的代码:
| |
或者用Markdown格式:
| |
Doc-Tests
- Rust 也会测试在文档注释中的代码,会隐式的加在
fn main()函数里面。 - The idea behind doc-tests is not to put all your tests into comments. Rather, you write the best possible documentation, and Rust makes sure the code samples in your documentation actually compile and run.
- To hide a line of a code sample, put a # followed by a space at the beginning of that line.
- rustdoc therefore treats any code block containing the exact string fn main as a complete program and doesn’t add anything to it.
- To tell Rust to compile your example, but stop short of actually running it, use a fenced code block with the
no_runannotation. - If the code isn’t even expected to compile, use
ignoreinstead ofno_run. Blocks marked withignoredon’t show up in the output of cargo run, but no_run tests show up as having passed if they compile. - If the code block isn’t Rust code at all, use the name of the language, like c++ or sh, or text for plain text.
Specifying Dependencies
用版本号:
| |
Git仓库地址和修订版本号:
| |
可以指定使用哪个 rev、tag 或 branch。
另一种方式是指定包含依赖包源代码的目录:
| |
Versions
对于在 Cargo.toml 中写的 image = "0.6.1" ,Cargo 的解释并没有那么严格。它会使用与 0.6.1 版兼容的最新版本的 image 。
兼容性的判断基本上遵循“语义化版本”的思想。
- 以0.0开头的版本过于原始,Cargo不会假设它与任何其他版本兼容。
- 以0.x(基本x不是0)开头的版本,会被认为同其他以0.x开头的版本兼容。
- 如果项目达到1.0版,则只有新的主版本号才会破坏兼容性。
不同项目对依赖和版本有不同的需求。因此,指定版本时可以使用操作符。例如>、>=、<=。
使用通配符*表示任何版本都可以,这个并不多见。
Cargo.lock
在第一次构建项目时,Cargo会输出一个Cargo.lock文件,记录它使用的每个包的确切的版本号。如果手动修改了Cargo.toml文件中的版本号或者运行cargo update时,会把新版本号保存到Cargo.lock文件中。
对于保存在Git代码库的依赖也是类似的。
如果你的项目是一个可执行文件,应该把Cargo.lock提交到版本控制系统。如果是一个普通的Rust库,就不用提交Cargo.lock了。如果恰好你的项目是一个共享库,没有这种下游的cargo用户,那就应该提供Cargo.lock。
Publishing Crates to crates.io
cargo package 让Cargo打包。会创建一个.crate文件,其中包含库的源文件以及Cargo.toml。
cargo package --list可以查看其中包含什么文件。
| |
可以同时指定本地依赖和版本号,不过要保证二者同步:
| |
接着就是发布了:
| |
Workspace
使用Cargo工作空间可以节省编译时间和磁盘空间。所谓工作空间,就是共享相同构建目录和Cargo.lock文件的一组包。
要使用工作空间,只需在存储库的根目录下创建一个Cargo.toml文件,并把下面几行放进去:
| |
Here fern_sim etc. are the names of the subdirectories containing your crates. Delete any leftover Cargo.lock files and target directories that exist in those subdirectories.
The command cargo build --workspace builds all crates in the current workspace. cargo test and cargo doc accept the --workspace option as well.
Chapter 9. Structs
Rust has three kinds of struct types, named-field, tuple-like, and unit-like, which differ in how you refer to their components: a named-field struct gives a name to each component, whereas a tuple- like struct identifies them by the order in which they appear. Unit-like structs have no components at all; these are not common, but more useful than you might think.
Named-Field Structs
| |
结构体的名字用驼峰命名法,其中的字段用蛇形拼写法。
You can use key: value syntax for some fields and shorthand for others in the same struct expression.
To access a struct’s fields, use the familiar . operator.
可以将结构体设为pub,但是字段默认私有。这样可以通过一些公有的方法创建结构体或者修改它。
使用.. EXPR,任何没有出现的字段都将从EXPR中取得自己的值,前提是EXPR必须为同一结构体类型的另一个值。
Tuple-Like Structs
类元组结构体:
| |
通过.操作符来访问。
定义此结构体会隐式定义一个函数:
| |
newtypes,即只包含一个要经过更严格类型检查的组件的结构体。
| |
Unit-Like Structs
| |
这种类型的值不占任何内存,像()。
Rust doesn’t bother actually storing unit-like struct values in memory or generating code to operate on them, because it can tell everything it might need to know about the value from its type alone. But logically, an empty struct is a type with values like any other—or more precisely, a type of which there is only a single value.
Struct Layout
| |
一种可能的内存布局:
Rust不保证结构体的字段或元素在内存中会以某种顺序存储,但是保证把字段的值直接存储在结构体的内存块中。
Defining Methods with impl
Functions defined in an impl block are called associated functions, since they’re associated with a specific type. The opposite of an associated function is a free function, one that is not defined as an impl block’s item.
self&self&mut self
当调用方法时,. 操作符会隐式转换,如果方法定义的是借用,就会隐式转换为引用。注意self会移动所有权。
Passing Self as a Box, Rc, or Arc
A method’s self argument can also be a Box<Self>, Rc<Self>, or Arc<Self>. Such a method can only be called on a value of the given pointer type. Calling the method passes ownership of the pointer to it.
| |
Rust automatically borrows a reference from pointer types like Box, Rc, and Arc, so &self and &mut self are almost always the right thing in a method signature, along with the occasional self.
| |
If the caller has an Rc<Node> at hand, it can call append_to directly, passing the Rc by value:
| |
Again, for most methods, &self, &mut self, and self (by value) are all you need. But if a method’s purpose is to affect the ownership of the value, using other pointer types for self can be just the right thing.
Type-Associated Functions
| |
Separating a type’s methods from its definition may seem unusual, but there are several advantages to doing so:
- It’s always easy to find a type’s data members.
- Pulling methods out into an impl block allows a single syntax for all three. In fact, Rust uses this same syntax for defining methods on types that are not structs at all, such as enum types and primitive types like i32.
- The same impl syntax also serves neatly for implementing traits, which we’ll go into in Chapter 11.
Associated Consts
| |
使用:
| |
Generic Structs
| |
相关方法:
| |
使用Self:
| |
For associated function calls, you can supply the type parameter explicitly using the ::<> (turbofish) notation:
| |
Structs with Lifetime Parameters
| |
当然这里生命周期参数也可以省略,因为可以根据三条规则进行推断。
Deriving Common Traits for Struct Types
| |
Interior Mutability
支持内部可变性,用Cell<T>和RefCell<T>,定义在std::cell模块中。
Cell<T>是只包含一个T类型私有值的结构体。Cell唯一特别的地方是不需要对其自身的mut引用,你也能取得或设置其私有字段的值。
Cell::new(value):创建一个新Cell,将value转移到其中。cell.get():返回cell中值的副本。要求 cell 实现 Copy trait。cell.set(value):把value保存到cell,丢弃之间保存的值。
RefCell<T>是只包含一个T类型值的泛型类型。但与Cell不同,RefCell<T>支持借用它的T类型值的引用。
RefCell::new(value):创建一个新RefCell,将value转移到其中。ref_cell.borrow():返回一个Ref<T>,基本上是对 ref_cell 中值的共享引用。This method panics if the value is already mutably borrowed.ref_cell.borrow_mut(): Returns aRefMut<T>, essentially a mutable reference to the value in ref_cell. This method panics if the value is already borrowed.ref_cell.try_borrow(),ref_cell.try_borrow_mut(): Work just likeborrow()andborrow_mut(), but return aResult. Instead of panicking if the value is already mutably borrowed, they return anErrvalue.
This is a lot like how normal references work. The only difference is that normally, when you borrow a reference to a variable, Rust checks at compile time to ensure that you’re using the reference safely. If the checks fail, you get a compiler error. RefCell enforces the same rule using run-time checks. So if you’re breaking the rules, you get a panic (or an Err, for try_borrow and try_borrow_mut).
The other drawback is less obvious and more serious: cells—and any types that contain them—are not thread-safe.
补充:参考RefCell 和内部可变性模式。
- 因为
RefCell<T>允许在运行时执行可变借用检查,所以我们可以在即便RefCell<T>自身是不可变的情况下修改其内部的值。
结构体是“与”的逻辑,而枚举是“或”的逻辑。
Chapter 10. Enums and Patterns
Enums
| |
这个是标准库中的,导入用use。也可以自己定义枚举,自己导入。
| |
In memory, values of C-style enums are stored as integers. Occasionally it’s useful to tell Rust which integers to use:
| |
Otherwise Rust will assign the numbers for you, starting at 0.
By default, Rust stores C-style enums using the smallest built-in integer type that can accommodate them. Most fit in a single byte.
#[repr]可以自己选择枚举的内存表示。
可以将C式枚举转换为整数,但是反过来不可以。
和结构体一样,可以给枚举加上属性,定义相关方法。
Enums with Data
一个枚举可以同时包含三种变体:
| |
All constructors and fields of an enum share the same visibility as the enum itself.
Enums in Memory
在内存中,带数据的每个构造式都需要一个小整数标签。
RoughTime的每个构造式占用8个字节。
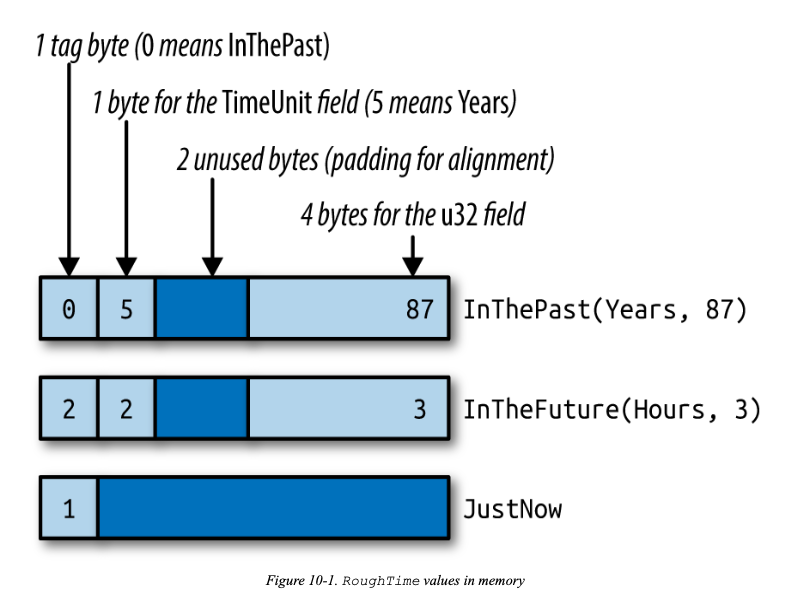
为了方便优化,Rust并未对枚举的内存布局方式做出任何承诺。For instance, some generic structs can be stored without a tag at all, as we’ll see later.
Rich Data Structures Using Enums
| |
内存布局:
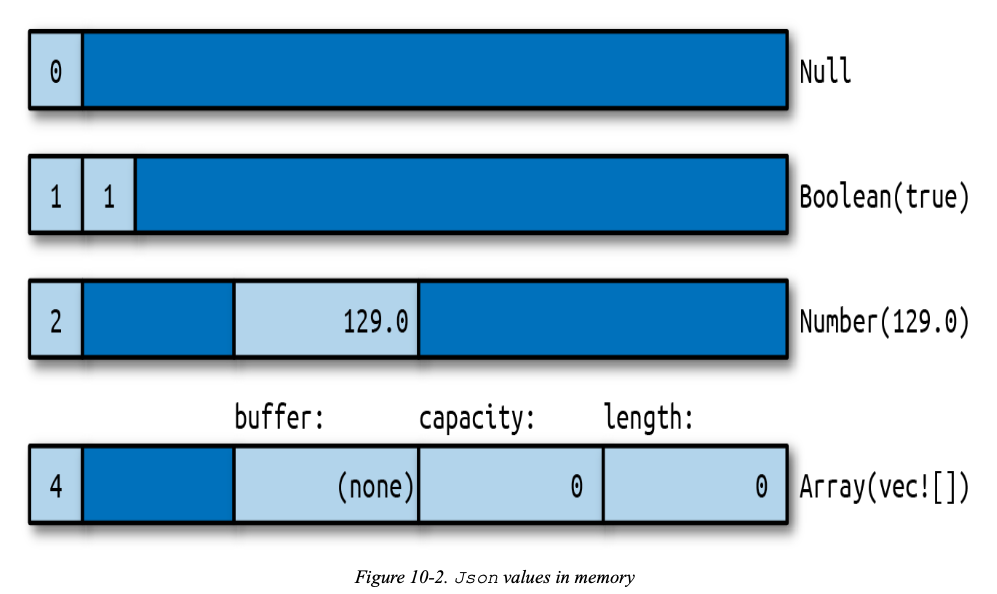
在内存中,Json类型的值占4个机器字。String和Vec值占3个机器字,Rust还会加一个标签字节。Null和Boolean值用不了那么多内存空间,但所有Json值的大小必须相同。
Box<HashMap>只占一个机器字,因为它只是一个指向分配到堆内存数据的指针。
Generic Enums
| |
**如果类型T是引用或Box或其他智能指针类型,Rust就会省掉Option<T>的标签字段。**因此Option<Box<i32>>在内存中只用1个机器字节存储。0表示None,非零表示Some封装的值。
| |
访问枚举数据唯一的方式是一种安全的方式:使用模式。
Patterns
在枚举中不能直接通过.操作符访问枚举的字段。可以用match表达式来进行模式匹配。
表达式产生值,模式消费值。
模式匹配会从左到右对比模式的每个组件,依次检查当前值是否与之匹配。如果不匹配,就前进到下一个模式。
| 模式类型 | 示例 | 说明 |
|---|---|---|
| Literal | ||
| Range | ||
| Wildcard Variable | ||
| ref variable | ||
| Binding with subpattern | ||
| Enum pattern | ||
| Tuple pattern | ||
| Array pattern | ||
| Slice pattern | ||
| Struct pattern | ||
| Reference | ||
| Multiple patterns | `‘a’ | ‘A’` |
| Guard expression | x if x * x <= r2 | In match only (not valid in let, etc.) |
Literals, Variables, and Wildcards in Patterns
| |
可以使用通配符_。
| |
即便你非常确定其他情况不会发生,也必须至少加上一个后备的panic分支:
| |
Tuple and Struct Patterns
元组模式匹配元组:
| |
结构体模式使用花括号:
| |
在结构体模式匹配中,可以使用...来告诉Rust你并不关心其他字段:
| |
Array and Slice Patterns
数组匹配:
| |
切片匹配:
| |
Reference Patterns
对于引用,Rust支持两种模式:ref模式和&模式。前者借用匹配值的元素,后者匹配引用。
需要一种模式来借用而不move匹配的值。用关键字ref。
| |
使用ref mut借用mut引用:
| |
以&开头的模式匹配引用。
| |
表达式和模式天生是相反的。表达式(x, y)用两个值创建一个新元组,模式(x, y)则相反:它匹配元组并破坏后取出两个值。对&而言也一样:表达式&创建引用,模式中的&匹配引用。匹配引用中,生命周期是必要条件。不能对共享引用采取mut操作。不能从引用(包括mut引用)中move出值。
| |
修改:
| |
可以使用&模式取得引用所指向的字符:
| |
Match Guards
| |
But Rust also provides match guards, extra conditions that must be true in order for a match arm to apply, written as if CONDITION, between the pattern and the arm’s => token:
| |
If the pattern matches, but the condition is false, matching continues with the next arm.
Matching Multiple Possibilities
| |
或者
| |
Binding with @ Patterns
x @ pattern匹配给定的 pattern,但成功之后,不是基于匹配值的元素来创建变量,而是把匹配值整个移动或复制到一个变量 x 中。
| |
@ patterns are also useful with ranges:
| |
Where Patterns Are Allowed
The meaning is always the same: instead of just storing a value in a single variable, Rust uses pattern matching to take the value apart.
| |
上面的都是 irrefutable patterns,下面的是refutable pattern。
| |
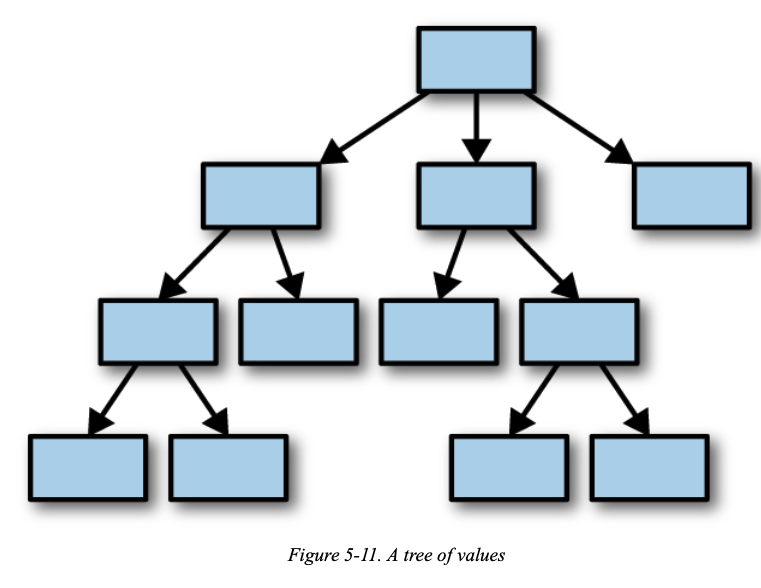
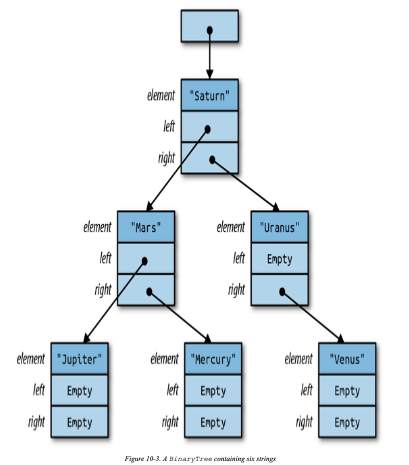
Populating a Binary Tree
| |
Chapter 11. Traits and Generics
Rust supports polymorphism with two related features: traits and generics.
Generics and traits are closely related: generic functions use traits in bounds to spell out what types of arguments they can be applied to. So we’ll also talk about how &mut dyn Write and <T: Write> are similar, how they’re different, and how to choose between these two ways of using traits.
Using Traits
- A value that implements
std::io::Writecan write out bytes. - A value that implements
std::iter::Iteratorcan produce a sequence of values. - A value that implements
std::clone::Clonecan make clones of itself in memory. - A value that implements
std::fmt::Debugcan be printed using println!() with the {:?} format specifier.
trait本身必须在作用域中。否则,trait的所有方法都是隐藏的。
But since Rust makes you import the traits you plan to use, crates are free to take advantage of this superpower. To get a conflict, you’d have to import two traits that add a method with the same name to the same type. This is rare in practice. (If you do run into a conflict, you can spell out what you want using fully qualified method syntax, covered later in the chapter.)
The reason Clone and Iterator methods work without any special imports is that they’re always in scope by default: they’re part of the standard prelude, names that Rust automatically imports into every module.
Trait Objects
Rust doesn’t permit variables of type dyn Write:
| |
A variable’s size has to be known at compile time, and types that implement Write can be any size.
| |
A reference to a trait type, like writer, is called a trait object. Like any other reference, a trait object points to some value, it has a lifetime, and it can be either mut or shared.
Trait object layout
In memory, a trait object is a fat pointer consisting of a pointer to the value, plus a pointer to a table representing that value’s type. Each trait object therefore takes up two machine words.
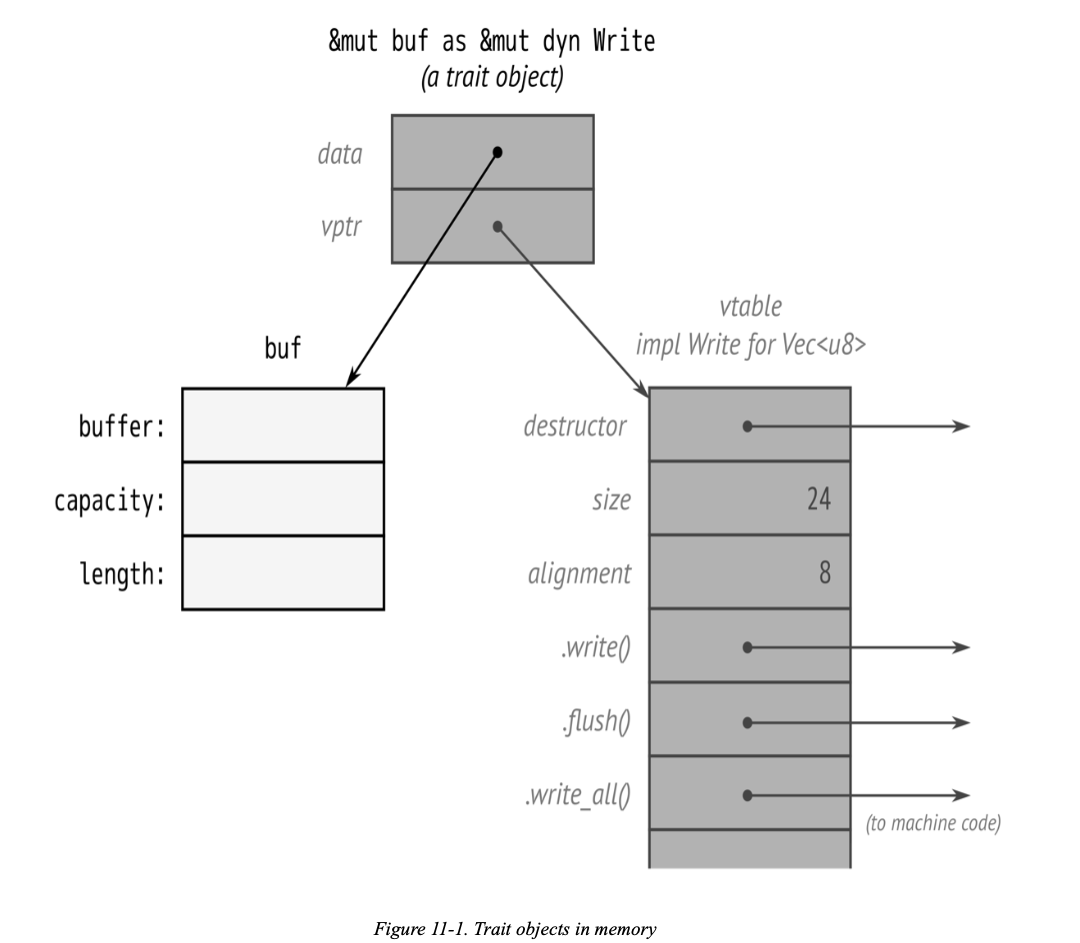
In Rust, as in C++, the vtable is generated once, at compile time, and shared by all objects of the same type. Everything shown in the darker shade in Figure 11-1, including the vtable, is a private implementation detail of Rust. Again, these aren’t fields and data structures that you can access directly. Instead, the language automatically uses the vtable when you call a method of a trait object, to determine which implementation to call.
Rust automatically converts ordinary references into trait objects when needed.
| |
Likewise, Rust will happily convert a Box<File> to a Box<dyn Write>, a value that owns a writer in the heap:
| |
This kind of conversion is the only way to create a trait object. What the compiler is actually doing here is very simple. At the point where the conversion happens, Rust knows the referent’s true type (in this case, File), so it just adds the address of the appropriate vtable, turning the regular pointer into a fat pointer.
Generic Functions and Type Parameters
| |
| |
This process is known as monomorphization, and the compiler handles it all automatically.
| |
| |
生命周期参数:
| |
生命周期不会对机器码有任何影响。
All the features introduced in this section—bounds, where clauses, lifetime parameters, and so forth—can be used on all generic items, not just functions.
Which to Use
| |
沙拉结构体用泛型函数实现,但是只能放一种蔬菜。
考虑到蔬菜值的大小可能差别比较大,不能直接用 Vec。
| |
可以这样实现:
| |
Another possible reason to use trait objects is to reduce the total amount of compiled code.
那么在不考虑沙拉或者low-resource environments这两种情况下,选择泛型函数有三个优点:
- The first advantage is speed. 会通过静态分发的方式,消除动态查找的时间。
- The second advantage of generics is that not every trait can support trait objects.
- The third advantage of generics is that it’s easy to bound a generic type parameter with several traits at once, as our top_ten function did when it required its T parameter to implement Debug + Hash + Eq. Trait objects can’t do this: types like &mut (dyn Debug + Hash + Eq) aren’t supported in Rust. (You can work around this with subtraits, defined later in this chapter, but it’s a bit involved.)
Defining and Implementing Traits
定义trait:
| |
实现trait,用impl TraitName for Type。
Everything defined in a trait impl must actually be a feature of the trait.
不在trait里的辅助方法要单独放在impl Type里面实现。而且实现trait时也可以调用这个辅助方法。
Default Methods
trait的默认实现:
| |
Traits and Other People’s Types
Rust lets you implement any trait on any type, as long as either the trait or the type is introduced in the current crate.
The sole purpose of this particular trait is to add a method to an existing type, char. This is called an extension trait.
| |
You can even use a generic impl block to add an extension trait to a whole family of types at once.
| |
We said earlier that when you implement a trait, either the trait or the type must be new in the current crate. This is called the orphan rule. It helps Rust ensure that trait implementations are unique.
Self in Traits
| |
Self作为返回类型意味着x.clone()的类型就是x的类型,不管具体什么类型。
使用Self类型的trait与trait objects不能共存。
| |
Rust rejects this code because it has no way to type-check the call left.splice(right). The whole point of trait objects is that the type isn’t known until run time. Rust has no way to know at compile time if left and right will be the same type, as required.
| |
There’s no problem type-checking calls to this .splice() method because the type of the argument other is not required to match the type of self, as long as both types are MegaSpliceable.
Subtraits
| |
Here, we say that Creature is a subtrait of Visible, and that Creature is Visible’s supertrait.
But in Rust, a subtrait does not inherit the associated items of its supertrait; each trait still needs to be in scope if you want to call its methods.
In fact, Rust’s subtraits are really just a shorthand for a bound on Self. A definition of Creature like this is exactly equivalent to the one shown earlier:
| |
Type-Associated Functions
Traits can include type-associated functions, Rust’s analog to static methods:
| |
If you want to use &dyn StringSet trait objects, you must change the trait, adding the bound where Self: Sized to each associated function that doesn’t take a self argument by reference:
| |
With these additions, StringSet trait objects are allowed; they still don’t support new or from_slice, but you can create them and use them to call .contains() and .add().
Fully Qualified Method Calls
| |
With fully qualified calls, you can say exactly which method you mean, and that can help in a few odd cases:
- When two methods have the same name.
1 2 3 4outlaw.draw(); // error: draw on screen or draw pistol? Visible::draw(&outlaw); // ok: draw on screen HasPistol::draw(&outlaw); // ok: corral - When the type of the self argument can’t be inferred:
1 2 3 4 5 6let zero = 0; // type unspecified; could be `i8`, `u8`, ... zero.abs(); // error: can't call method `abs` // on ambiguous numeric type i64::abs(zero); // ok - When using the function itself as a function value:
1 2 3 4let words: Vec<String> = line.split_whitespace() // iterator produces &str values .map(ToString::to_string) // ok .collect(); - When calling trait methods in macros.
Traits That Define Relationships Between Types
Traits can also be used in situations where there are multiple types that have to work together. They can describe relationships between types.
Associated Types (or How Iterators Work)
| |
The first feature of this trait, type Item;, is an associated type.
| |
trait object:
| |
Generic Traits (or How Operator Overloading Works)
| |
The type parameter here means the same thing that it means on a struct or function: Mul is a generic trait, and its instances Mul<f64>, Mul<String>, Mul<Size>, etc., are all different traits.
Generic traits get a special dispensation when it comes to the orphan rule: you can implement a foreign trait for a foreign type, so long as one of the trait’s type parameters is a type defined in the current crate.
| |
The syntax RHS=Self means that RHS defaults to Self. If I write impl Mul for Complex, without specifying Mul’s type parameter, it means impl Mul<Complex> for Complex. In a bound, if I write where T: Mul, it means where T: Mul<T>.
impl Trait
| |
这种写法太繁琐,可以这样写:
| |
但是这是动态分发,影响效率。可以使用 impl Trait。
| |
| |
It’s important to note that Rust doesn’t allow trait methods to use impl Trait return values.
| |
There is one important exception. Using generics allows callers of the function to specify the type of the generic arguments, like print::<i32>(42), while using impl Trait does not.
Associated Consts
| |
| |
Reverse-Engineering Bounds
和编译器做斗争,加上 Bounds。
| |
或者用第三方库num。
| |
Rust为什么要这样设计呢?为什么不模仿“鸭子类型”?这样设计的优点是:
- 可以让泛型代码具有向前兼容的能力。
- 你能通过编译器保存就知道要解决的麻烦在哪里。
- 或许,明确写出绑定最重要的好处是它们在代码和文档里都存在。
Traits as a Foundation
Traits are one of the main organizing features in Rust, and with good reason. There’s nothing better to design a program or library around than a good interface.
Chapter 12. Operator Overloading
The traits for operator overloading fall into a few categories depending on what part of the language they support.
| 类别 | Trait | 操作符 |
|---|---|---|
| Unary operators | std::ops::Neg | -x |
| std::ops::Not | !x | |
| Arithmetic operators | std::ops::Add | x + y |
| std::ops::Sub | x - y | |
| std::ops::Mul | x * y | |
| std::ops::Div | x / y | |
| std::ops::Rem | x % y | |
| Bitwise operators | std::ops::BitAnd | x & y |
| std::ops::BitOr | `x | |
| std::ops::BitXor | x ^ y | |
| std::ops::Shl | x << y | |
| std::ops::Shr | x >> y | |
| Compound assignment | std::ops::AddAssign | x += y |
| arithmetic operators | std::ops::SubAssign | x -= y |
| std::ops::MulAssign | x *= y | |
| std::ops::DivAssign | x /= y | |
| std::ops::RemAssign | x %= y | |
| Compound assignment | std::ops::BitAddAssign | x &= y |
| bitwise operators | std::ops::BitOrAssign | `x |
| std::ops::BitXorAssign | x ^= y | |
| std::ops::ShlAssign | x <<= y | |
| std::ops::ShrAssign | x >>= y | |
| Comparison | std::cmp::PartialEq | x == y, x != y |
| std::cmp::PartialOrd | x < y, x <= y, x > y, x >= y | |
| Indexing | std::ops::Index | x[y]、&x[y] |
| std::ops::IndexMut | x[y] = z、&mut x[y] |
Arithmetic and Bitwise Operators
std::ops::Add定义:
| |
实现:
| |
混合实现,加法的左边和右边不要求是同一类型:
| |
Unary Operators
Note that ! complements bool values and performs a bitwise complement (that is, flips the bits) when applied to integers; it plays the role of both the ! and ~ operators from C and C++.
| |
复数的实现:
| |
Binary Operators
All of Rust’s numeric types implement the arithmetic operators. Rust’s integer types and bool implement the bitwise operators. There are also implementations that accept references to those types as either or both operands.
You can use the + operator to concatenate a String with a &str slice or another String. However, Rust does not permit the left operand of + to be a &str, to discourage building up long strings by repeatedly concatenating small pieces on the left. (This performs poorly, requiring time quadratic in the final length of the string.)
Compound Assignment Operators
A compound assignment expression is one like x += y or x &= y: it takes two operands, performs some operation on them like addition or a bitwise AND, and stores the result back in the left operand. In Rust, the value of a compound assignment expression is always (), never the value stored.
Many languages have operators like these and usually define them as shorthand for expressions like x = x + y or x = x & y. However, Rust doesn’t take that approach. Instead, x += y is shorthand for the method call x.add_assign(y), where add_assign is the sole method of the std::ops::AddAssign trait:
| |
The built-in trait for a compound assignment operator is completely independent of the built-in trait for the corresponding binary operator.
Equivalence Comparisons
| |
用属性快速实现:
| |
Rust’s automatically generated implementation is essentially identical to our hand-written code, comparing each field or element of the type in turn.
This means that comparing non-Copy values like Strings, Vecs, or HashMaps doesn’t cause them to be moved, which would be troublesome:
| |
Why is this trait called PartialEq? The traditional mathematical definition of an equivalence relation, of which equality is one instance, imposes three requirements. For any values x and y:
对称性:If x == y is true, then y == x must be true as well. In other words, swapping the two sides of an equality comparison doesn’t affect the result.
传递性:If x == y and y == z, then it must be the case thatx == z. Given any chain of values, each equal to the next, each value in the chain is directly equal to every other. Equality is contagious.
自反性:It must always be true that x == x.
PartialEq只实现了前两条,自反性不保证,比如f32和f64就不满足。0.0/0.0会产生非数字的值NaN。
| |
Eq Trait:
| |
也可以用属性来快速实现:
| |
Ordered Comparisons
std::cmp::PartialOrd:
| |
| |
But if partial_cmp returns None, that means self and other are unordered with respect to each other: neither is greater than the other, nor are they equal. Among all of Rust’s primitive types, only comparisons between floating-point values ever return None: specifically, comparing a NaN (not-a-number) value with anything else returns None.
If you know that values of two types are always ordered with respect to each other, then you can implement the stricter std::cmp::Ord trait:
| |
Almost all types that implement PartialOrd should also implement Ord. In the standard library, f32 and f64 are the only exceptions to this rule.
排序应该同时实现 Partial Ord 和 Ord 。You might want to sort by upper bound, for instance, and it’s easy to do that with sort_by_key:
| |
The Reverse wrapper type takes advantage of this by implementing Ord with a method that simply inverts any ordering.
| |
Index and IndexMut
On any other type, the expression a[i] is normally shorthand for *a.index(i), where index is a method of the std::ops::Index trait. However, if the expression is being assigned to or borrowed mutably, it’s instead shorthand for *a.index_mut(i), a call to the method of the std::ops::IndexMut trait.
| |
You can refer to a subslice with an expression like a[i..j] because they also implement Index<Range<usize>>. That expression is shorthand for:
| |
| |
The Index trait’s associated type Output specifies what type an indexing expression produces: for our HashMap, the Index implementation’s Output type is i32.
Rust automatically selects index_mut when the indexing expression occurs in a context where it’s necessary.
| |
后两行和下面的代码一样:
| |
One limitation of IndexMut is that, by design, it must return a mutable reference to some value.
The most common use of indexing is for collections.
This is how Index and IndexMut implementations are supposed to behave: out-of-bounds access is detected and causes a panic, the same as when you index an array, slice, or vector out of bounds.
Other Operators
Not all operators can be overloaded in Rust. As of Rust 1.50, the error-checking ? operator works only with Result and Option values, though work is in progress to expand this to user-defined types as well. Similarly, the logical operators && and || are limited to Boolean values only. The .. and ..= operators always create a struct representing the range’s bounds, the & operator always borrows references, and the = operator always moves or copies values. None of them can be overloaded.
Rust does not support overloading the function call operator, f(x). Instead, when you need a callable value, you’ll typically just write a closure.
Chapter 13. Utility Traits
Language extension traits
- Drop, Deref and DerefMut
- From and Into
Marker traits
- Sized
- Copy
Public vocabulary traits
- Default
- AsRef, AsMut, Borrow and BorrowMut
- TryFrom and TryInto
- ToOwned
| Trait | Description |
|---|---|
| Drop | Destructors. Cleanup code that Rust runs automatically whenever a value is dropped. |
| Sized | Marker trait for types with a fixed size known at compile time, as opposed to types (such as slices) that are dynamically sized. |
| Clone | Types that support cloning values. |
| Copy | Marker trait for types that can be cloned simply by making a byte-for-byte copy of the memory containing the value. |
| Deref and DerefMut | Traits for smart pointer types. |
| Default | Types that have a sensible “default value.” |
| AsRef and AsMut | Conversion traits for borrowing one type of reference from another. |
| Borrow and BorrowMut | Conversion traits, like AsRef/AsMut, but additionally guaranteeing consistent hashing, ordering, and equality. |
| From and Into | Conversion traits for transforming one type of value into another. |
| TryFrom and TryInto | Conversion traits for transforming one type of value into another, for transformations that might fail. |
| ToOwned | Conversion trait for converting a reference to an owned value. |
Drop
std::ops::Drop trait
| |
This implicit invocation of drop is the only way to call that method; if you try to invoke it explicitly yourself, Rust flags that as an error.
If a variable’s value gets moved elsewhere, so that the variable is uninitialized when it goes out of scope, then Rust will not try to drop that variable: there is no value in it to drop. Although a value may be moved from place to place, Rust drops it only once.
You usually won’t need to implement std::ops::Drop unless you’re defining a type that owns resources Rust doesn’t already know about.
If a type implements Drop, it cannot implement the Copy trait. If a type is Copy, that means that simple byte-for-byte duplication is sufficient to produce an independent copy of the value. But it is typically a mistake to call the same drop method more than once on the same data.
The standard prelude includes a function to drop a value, drop, but its definition is anything but magical:
| |
从调用者那里获得所有权,然后什么也不做。Rust会在超出作用域时清楚_x的值,跟清除其他变量的值一样。
Sized
A sized type is one whose values all have the same size in memory.
All sized types implement the std::marker::Sized trait, which has no methods or associated types. Rust implements it automatically for all types to which it applies; you can’t implement it yourself. The only use for Sized is as a bound for type variables: a bound like T: Sized requires T to be a type whose size is known at compile time. Traits of this sort are called marker traits, because the Rust language itself uses them to mark certain types as having characteristics of interest.
Rust can’t store unsized values in variables or pass them as arguments. You can only deal with them through pointers like &str or Box<dyn Write>, which themselves are sized.
In fact, this is necessary so often that it is the implicit default in Rust: if you write struct S<T> { ... }, Rust understands you to mean struct S<T: Sized> { ... }. If you do not want to constrain T this way, you must explicitly opt out, writing struct S<T: ?Sized> { ... }. The ?Sized syntax is specific to this case and means “not necessarily Sized.” For example, if you write struct S<T: ?Sized> { b: Box<T> }, then Rust will allow you to write S<str> and S<dyn Write>, where the box becomes a fat pointer, as well as S<i32> and S<String>, where the box is an ordinary pointer.
Aside from slices and trait objects, there is one more kind of unsized type. A struct type’s last field (but only its last) may be unsized, and such a struct is itself unsized.
| |
Clone
std::clone::Clone
| |
clone_from方法将self修改为source的一个副本。这个方法的默认定义知识简单地克隆了source,然后将副本转移到*self中。语句s = t.clone();必须先克隆t,清除s原来的值,然后再将克隆的值转移到s中。这涉及一次堆分配和一次堆释放。在泛型代码中,应该尽可能使用clone_from,从而在可能的情况下应用这种优化。
加上#[derive(Clone)]实现。
没有实现Clone:std::sync::Mutex、stf::file::File(但是提供了一个try_clone()方法)。
Copy
A type is Copy if it implements the std::marker::Copy marker trait, which is defined as follows:
| |
But because Copy is a marker trait with special meaning to the language, Rust permits a type to implement Copy only if a shallow byte-for-byte copy is all it needs. Types that own any other resources, like heap buffers or operating system handles, cannot implement Copy. Any type that implements the Drop trait cannot be Copy. Rust presumes that if a type needs special cleanup code, it must also require special copying code and thus can’t be Copy.
As with Clone, you can ask Rust to derive Copy for you, using #[derive(Copy)]. You will often see both derived at once, with #[derive(Copy, Clone)].
Deref and DerefMut
std::ops::Deref
| |
std::ops::DerefMut
| |
Since the methods return a reference with the same lifetime as &self, self remains borrowed for as long as the returned reference lives.
由于deref接收&self引用并返回&Self::Target引用,因此Rust会利用这一点自动将前一种类型的引用转换为后一种类型的引用。换一句话说,如果插入一次deref调用可以防止类型错配,那Rust会为你插入一次。实现DerefMut可以实现对可修改引用的类型转换。这种类型转换称为解引用强制转型(deref coercion),即一种类型被“强制”表现出另一种类型的行为。
使用解引用强制类型转换很方便:
Rc<T>实现了Deref<Target=T>String实现了Deref<Target=str>Vec<T>实现了Deref<Target=[T]>
必要情况下,Rust会连续多次应用解引用强制转换。
Deref和DerefMut trait的设计初衷是为了实现智能指针类型(如Box、Rc和Arc),以及某些频繁通过引用来使用的类型的所有者版本(如Vec<T>和String就是[T]和str的所有者版本)。
Rust通过应用解引用强制转换来解决类型冲突,但不会应用它来满足类型变量的绑定。
| |
Rust不会在满足类型变量的绑定时应用解引用强制类型转换,所以检查失败。
| |
Default
std::default::Default
| |
| |
But of course, partition isn’t specific to HashSets; you can use it to produce any sort of collection you like, as long as the collection type implements Default, to produce an empty collection to start with, and Extend<T>, to add a T to the collection. String implements Default and Extend<char>, so you can write:
| |
Another common use of Default is to produce default values for structs that represent a large collection of parameters, most of which you won’t usually need to change.
| |
If a type T implements Default, then the standard library implements Default automatically for Rc<T>, Arc<T>, Box<T>, Cell<T>, RefCell<T>, Cow<T>, Mutex<T>, and RwLock<T>. The default value for the type Rc<T>, for example, is an Rc pointing to the default value for type T.
如果元组类型的所有类型都实现了Default,且该该元组类型也实现了Default,那么这个元组默认会持有每个元素的默认值。
Rust does not implicitly implement Default for struct types, but if all of a struct’s fields implement Default, you can implement Default for the struct automatically using # [derive(Default)].
AsRef and AsMut
std::convert::AsRef
| |
std::convert::RefMut
| |
So, for example, Vec<T> implements AsRef<[T]>, and String implements AsRef<str>. You can also borrow a String’s contents as an array of bytes, so String implements AsRef<[u8]> as well.
But this can’t be the whole story. A string literal is a &str, but the type that implements AsRef<Path> is str, without an &. And as we explained in “Deref and DerefMut”, Rust doesn’t try deref coercions to satisfy type variable bounds, so they won’t help here either.
Fortunately, the standard library includes the blanket implementation:
| |
In other words, for any types T and U, if T: AsRef<U>, then &T: AsRef<U> as well: simply follow the reference and proceed as before.
You might assume that if a type implements AsRef
Borrow and BorrowMut
The std::borrow::Borrow trait is similar to AsRef: if a type implements Borrow<T>, then its borrow method efficiently borrows a &T from it. But Borrow imposes more restrictions: a type should implement Borrow
| |
Borrow is designed to address a specific situation with generic hash tables and other associative collection types.
| |
Vec
The standard library includes a blanket implementation so that every type T can be borrowed from itself: T: Borrow
std::borrow::BorrowMut
| |
From and Into
The std::convert::From and std::convert::Into traits represent conversions that consume a value of one type and return a value of another.
| |
The standard library automatically implements the trivial conversion from each type to itself: every type T implements From<T> and Into<T>.
You generally use Into to make your functions more flexible in the arguments they accept.
The from method serves as a generic constructor for producing an instance of a type from some other single value.
Given an appropriate From implementation, the standard library automatically implements the corresponding Into trait.
However, cheap conversions are not part of Into and From’s contract. Whereas AsRef and AsMut conversions are expected to be cheap, From and Into conversions may allocate, copy, or otherwise process the value’s contents.
The ? operator uses From and Into to help clean up code in functions that could fail in multiple ways by automatically converting from specific error types to general ones when needed.
| |
| |
From and Into are infallible traits—their API requires that conversions will not fail.
TryFrom and TryInto
Instead, i32 implements TryFrom
| |
Where From and Into relate types with simple conversions, TryFrom and TryInto extend the simplicity of From and Into conversions with the expressive error handling afforded by Result. These four traits can be used together to relate many types in a single crate.
ToOwned
The std::borrow::ToOwned trait provides a slightly looser way to convert a reference to an owned value:
| |
Borrow and ToOwned at Work: The Humble Cow
But in some cases you cannot decide whether to borrow or own until the program is running ; the std::borrow::Cow type (for “clone on write”) provides one way to do this.
| |
A Cow<B> either borrows a shared reference to a B or owns a value from which we could borrow such a reference. Since Cow implements Deref, you can call methods on it as if it were a shared reference to a B: if it’s Owned, it borrows a shared reference to the owned value; and if it’s Borrowed, it just hands out the reference it’s holding.
You can also get a mutable reference to a Cow’s value by calling its to_mut method, which returns a &mut B. If the Cow happens to be Cow::Borrowed, to_mut simply calls the reference’s to_owned method to get its own copy of the referent, changes the Cow into a Cow::Owned, and borrows a mutable reference to the newly owned value. This is the “clone on write” behavior the type’s name refers to.
One common use for Cow is to return either a statically allocated string constant or a computed string.
| |
Chapter 14. Closures
It’s more concise to write the helper function as a closure, an anonymous function expression:
| |
Capturing Variables
A closure can use data that belongs to an enclosing function.
| |
Closures That Borrow
In this case, when Rust creates the closure, it automatically borrows a reference to stat. It stands to reason: the closure refers to stat, so it must have a reference to it.
In short, Rust ensures safety by using lifetimes instead of garbage collection. Rust’s way is faster: even a fast GC allocation will be slower than storing stat on the stack, as Rust does in this case.
Closures That Steal
| |
The only thing we’ve changed is to add the move keyword before each of the two closures. The move keyword tells Rust that a closure doesn’t borrow the variables it uses: it steals them.
Rust thus offers two ways for closures to get data from enclosing scopes: moves and borrowing.
We get something important by accepting Rust’s strict rules: thread safety. It is precisely because the vector is moved, rather than being shared across threads, that we know the old thread won’t free the vector while the new thread is modifying it.
Function and Closure Types
| |
| |
| |
In fact, every closure you write has its own type, because a closure may contain data: values either borrowed or stolen from enclosing scopes. This could be any number of variables, in any combination of types. So every closure has an ad hoc type created by the compiler, large enough to hold that data. No two closures have exactly the same type. But every closure implements an Fn trait; the closure in our example implements Fn(&City) -> i64.
Closure Performance
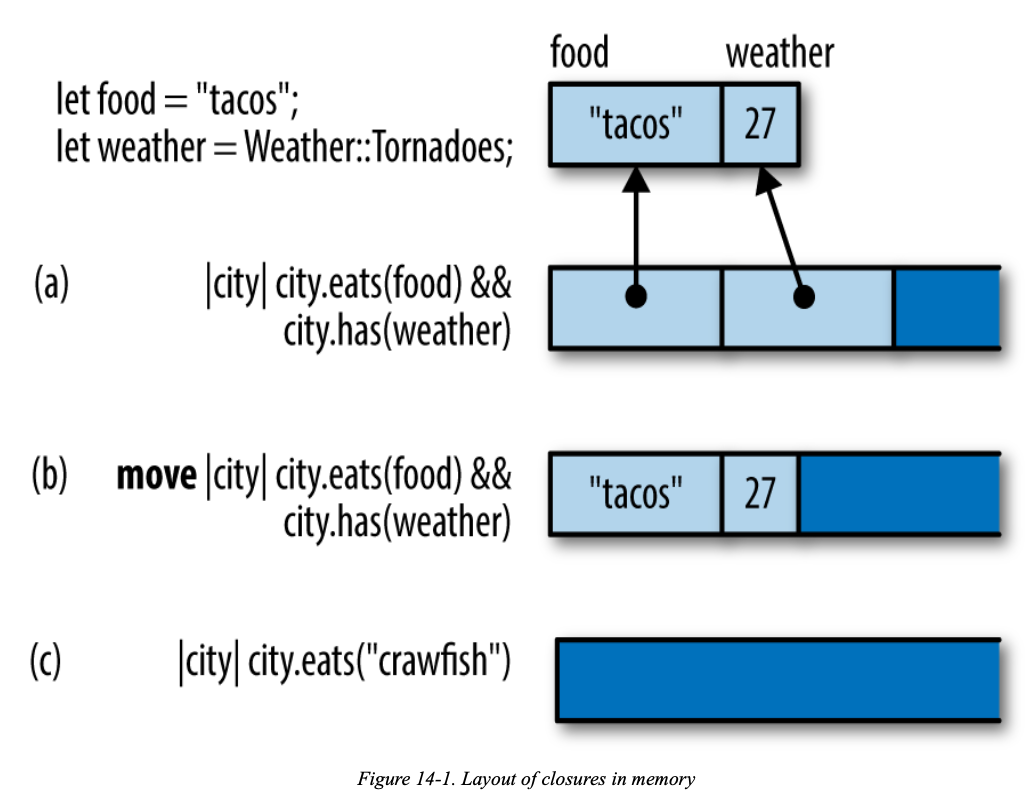
As the figure shows, these closures don’t take up much space. But even those few bytes are not always needed in practice. Often, the compiler can inline all calls to a closure, and then even the small structs shown in this figure are optimized away.
Closures and Safety
Closures That Kill
| |
A closure that can be called only once may seem like a rather extraordinary thing, but we’ve been talking throughout this book about ownership and lifetimes. The idea of values being used up (that is, moved) is one of the core concepts in Rust. It works the same with closures as with everything else.
FnOnce
The first time you call a FnOnce closure, the closure itself is used up. It’s as though the two traits, Fn and FnOnce, were defined like this:
| |
Just as an arithmetic expression like a + b is shorthand for a method call, Add::add(a, b), Rust treats closure() as shorthand for one of the two trait methods shown in the preceding example. For an Fn closure, closure() expands to closure.call(). This method takes self by reference, so the closure is not moved. But if the closure is only safe to call once, then closure() expands to closure.call_once(). That method takes self by value, so the closure is used up.
FnMut
Therefore, Rust has one more category of closure, FnMut, the category of closures that write. FnMut closures are called by mut reference, as if they were defined like this:
| |
Any closure that requires mut access to a value, but doesn’t drop any values, is an FnMut closure.
- Fn is the family of closures and functions that you can call multiple times without restriction. This highest category also includes all fn functions.
- FnMut is the family of closures that can be called multiple times if the closure itself is declared mut.
- FnOnce is the family of closures that can be called once, if the caller owns the closure.

Copy and Clone for Closures
Just as Rust automatically figures out which closures can be called only once, it can figure out which closures can implement Copy and Clone, and which cannot.
A non-move closure that doesn’t mutate variables holds only shared references, which are both Clone and Copy, so that closure is both Clone and Copy as well.
On the other hand, a non-move closure that does mutate values has mutable references within its internal representation. Mutable references are neither Clone nor Copy, so neither is a closure that uses them.
For a move closure, the rules are even simpler. If everything a move closure captures is Copy, it’s Copy. If everything it captures is Clone, it’s Clone.
Callbacks
Closures have unique types because each one captures different variables, so among other things, they’re each a different size. If they don’t capture anything, though, there’s nothing to store. By using fn pointers in functions that take callbacks, you can restrict a caller to use only these noncapturing closures, gaining some perfomance and flexibility within the code using callbacks at the cost of flexibility for the users of your API.
Using Closures Effectively
MVC
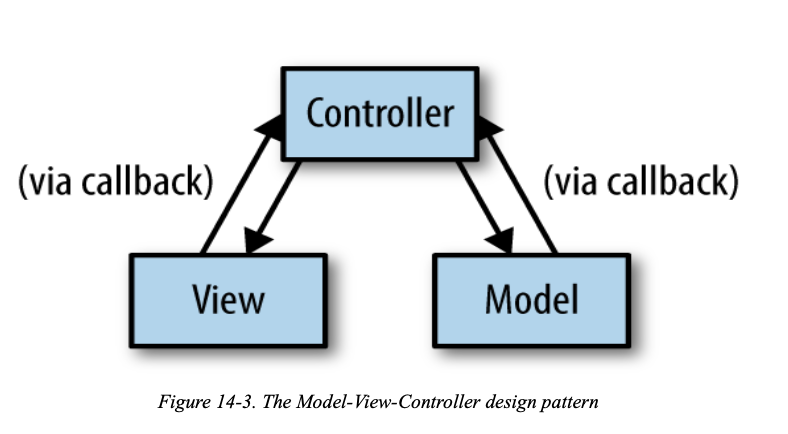
替代方案:
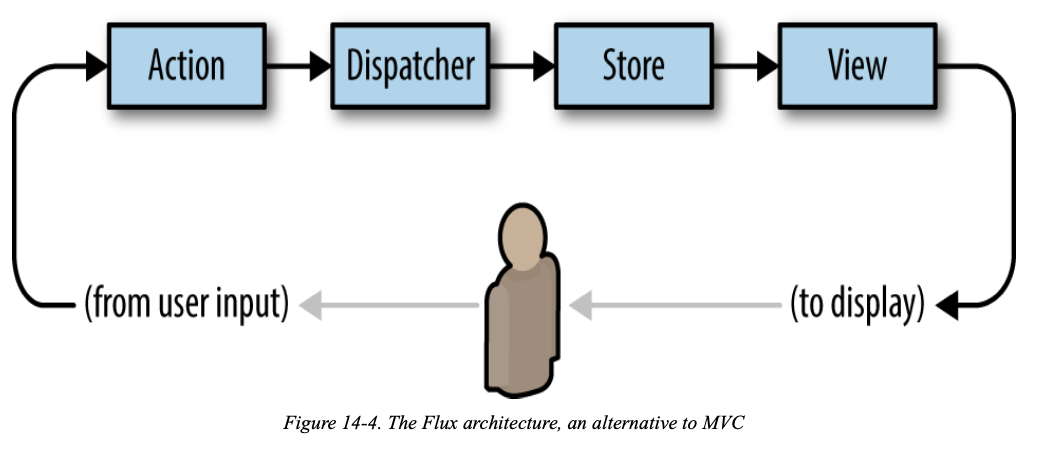
Chapter 15. Iterators
| |
这里1..=n是一个RangeInclusive<i32>的值。A RangeInclusive<i32> is an iterator that produces the integers from its start value to its end value (both inclusive), so you can use it as the operand of the for loop to sum the values from 1 to n.
也可以用闭包写,更简洁和优雅:
| |
The Iterator and IntoIterator Traits
std::iter::Iterator
| |
std::iter::IntoIterator
| |
这个表示可迭代的,可以调用 into_iter() 方法产生一个迭代器。
| |
等价于
| |
Although a for loop always calls into_iter on its operand, you can also pass iterators to for loops directly; this occurs when you loop over a Range, for example. All iterators automatically implement IntoIterator, with an into_iter method that simply returns the iterator.
Creating Iterators
iter and iter_mut Methods
Most collection types provide iter and iter_mut methods that return the natural iterators over the type, producing a shared or mutable reference to each item.
| |
This iterator’s item type is &i32: each call to next produces a reference to the next element, until we reach the end of the vector.
For example, there is no iter method on the &str string slice type. Instead, if s is a &str, then s.bytes() returns an iterator that produces each byte of s, whereas s.chars() interprets the contents as UTF-8 and produces each Unicode character.
IntoIterator Implementations
Most collections actually provide several implementations of IntoIterator, for shared references (&T), mutable references (&mut T), and moves (T):
- Given a shared reference to the collection, into_iter returns an iterator that produces shared references to its items. For example, in the preceding code, (&favorites).into_iter() would return an iterator whose Item type is &String.
- Given a mutable reference to the collection, into_iter returns an iterator that produces mutable references to the items. For example, if vector is some Vec
, the call (&mut vector).into_iter() returns an iterator whose Item type is &mut String. - When passed the collection by value, into_iter returns an iterator that takes ownership of the collection and returns items by value; the items’ ownership moves from the collection to the consumer, and the original collection is consumed in the process. For example, the call favorites.into_iter() in the preceding code returns an iterator that produces each string by value; the consumer receives ownership of each string. When the iterator is dropped, any elements remaining in the BTreeSet are dropped too, and the set’s now-empty husk is disposed of.
The general principle is that iteration should be efficient and predictable, so rather than providing implementations that are expensive or could exhibit surprising behavior (for example, rehashing modified HashSet entries and potentially encountering them again later in the iteration), Rust omits them entirely.
用在泛型上:
| |
from_fn and successors
std::iter::from_fn
| |
| |
If each item depends on the one before, std::iter::successors.
| |
| |
斐波那契数列
| |
drain Methods
Many collection types provide a drain method that takes a mutable reference to the collection and returns an iterator that passes ownership of each element to the consumer. However, unlike the into_iter() method, which takes the collection by value and consumes it, drain merely borrows a mutable reference to the collection, and when the iterator is dropped, it removes any remaining elements from the collection and leaves it empty.
| |
Other Iterator Sources
省略
Iterator Adapters
map and filter
The Iterator trait’s map adapter lets you transform an iterator by applying a closure to its items. The filter adapter lets you filter out items from an iterator, using a closure to decide which to keep and which to drop.
| |
| |
| |
First, simply calling an adapter on an iterator doesn’t consume any items; it just returns a new iterator, ready to produce its own items by drawing from the first iterator as needed. In a chain of adapters, the only way to make any work actually get done is to call next on the final iterator.
The term “lazy” in the error message is not a disparaging term; it’s just jargon for any mechanism that puts off a computation until its value is needed. It is Rust’s convention that iterators should do the minimum work necessary to satisfy each call to next; in the example, there are no such calls at all, so no work takes place.
The second important point is that iterator adapters are a zero-overhead abstraction.
filter_map and flat_map
| |
| |
| |
| |
运行结果:
| |
flatten
| |
| |
take and take_while
The Iterator trait’s take and take_while adapters let you end an iteration after a certain number of items or when a closure decides to cut things off.
| |
| |
结果:
| |
skip and skip_while
The Iterator trait’s skip and skip_while methods are the complement of take and take_while: they drop a certain number of items from the beginning of an iteration, or drop items until a closure finds one acceptable, and then pass the remaining items through unchanged.
| |
| |
输出结果为:
| |
peekable
A peekable iterator lets you peek at the next item that will be produced without actually consuming it. You can turn any iterator into a peekable iterator by calling the Iterator trait’s peekable method:
| |
Here, Peekable<Self> is a struct that implements Iterator<Item=Self::Item>, and Self is the type of the underlying iterator.
fuse
fuse 适配器可以将任何适配器转换为第一次返回None之后始终继续返回None的迭代器。
| |
Reversible Iterators and rev
从序列两端取得项。实现std::iter::DoubleEndedIterator trait。
| |
| |
If an iterator is double-ended, you can reverse it with the rev adapter:
| |
The returned iterator is also double-ended: its next and next_back methods are simply exchanged:
| |
inspect
| |
chain
将一个迭代器加到另一个迭代器后面。
| |
In other words, you can chain an iterator together with any iterable that produces the same item type.
| |
enumerate
| |
You can think of the (index, item) pairs that enumerate produces as analogous to the (key, value) pairs that you get when iterating over a HashMap or other associative collection. If you’re iterating over a slice or vector, the index is the “key” under which the item appears.
zip
The zip adapter combines two iterators into a single iterator that produces pairs holding one value from each iterator, like a zipper joining its two sides into a single seam. The zipped iterator ends when either of the two underlying iterators ends.
| |
The argument to zip doesn’t need to be an iterator itself; it can be any iterable:
| |
by_ref
An iterator’s by_ref method borrows a mutable reference to the iterator so that you can apply adapters to the reference. When you’re done consuming items from these adapters, you drop them, the borrow ends, and you regain access to your original iterator.
| |
cloned, copied
The cloned adapter takes an iterator that produces references and returns an iterator that produces values cloned from those references, much like iter.map(|item| item.clone()). Naturally, the referent type must implement Clone.
| |
The copied adapter is the same idea, but more restrictive: the referent type must implement Copy. A call like iter.copied() is roughly the same as iter.map(|r| *r).
cycle
The cycle adapter returns an iterator that endlessly repeats the sequence produced by the underlying iterator. The underlying iterator must implement std::clone::Clone so that cycle can save its initial state and reuse it each time the cycle starts again.
| |
Consuming Iterators
Simple Accumulation: count, sum, product
| |
The count method draws items from an iterator until it returns None and tells you how many it got.
The sum and product methods compute the sum or product of the iterator’s items, which must be integers or floating-point numbers.
max, min
std::iter::Iterator
| |
max_by, min_by
| |
| |
max_by_key, min_by_key
| |
| |
Comparing Item Sequences
Iterators provide the eq and ne methods for equality comparisons, and lt, le, gt, and ge methods for ordered comparisons. The cmp and partial_cmp methods behave like the corresponding methods of the Ord and PartialOrd traits.
any and all
| |
position, rposition, and ExactSizeIterator
The position method applies a closure to each item from the iterator and returns the index of the first item for which the closure returns true.
The rposition method is the same, except that it searches from the right.
| |
| |
fold and rfold
| |
fold方法是一个通用工具,可以对迭代器产生项的整个序列执行某些累计操作。这个方法接收一个名为累加器的初始值和一个闭包,然后对当前累加器和迭代器的下一项重复应用闭包。每次闭包的返回值都会成为累加器的新值,然后再和迭代器的下一项一块传给闭包。累加器的最终值也是fold方法返回的值。如果序列是空的,则fold返回累加器的初始值。
| |
累加器的值会转移到闭包中再转移出来,因此可以对非Copy类型的累加器使用fold:
| |
The rfold method is the same as fold, except that it requires a double-ended iterator, and processes its items from last to first.
try_fold and try_rfold
The try_fold method is the same as fold, except that the process of iteration can exit early, without consuming all the values from the iterator. The closure you pass to try_fold must return a Result: if it returns Err(e), try_fold returns immediately with Err(e) as its value. Otherwise, it continues folding with the success value. The closure can also return an Option: returning None exits early, and the result is an Option of the folded value.
| |
| |
| |
nth, nth_back
| |
last
| |
This consumes all the iterator’s items starting from the front, even if the iterator is reversible. If you have a reversible iterator and don’t need to consume all its items, you should instead just write iter.next_back().
find, rfind, and find_map
| |
| |
| |
Building Collections: collect and FromIterator
| |
| |
分配时提高效率:
| |
This method returns a lower bound and optional upper bound on the number of items the iterator will produce. The default definition returns zero as the lower bound and declines to name an upper bound, saying, in effect, “I have no idea,” but many iterators can do better than this. An iterator over a Range, for example, knows exactly how many items it will produce, as does an iterator over a Vec or HashMap. Such iterators provide their own specialized definitions for size_hint.
The Extend Trait
If a type implements the std::iter::Extend trait, then its extend method adds an iterable’s items to the collection.
| |
partition
The partition method divides an iterator’s items among two collections, using a closure to decide where each item belongs.
| |
Other languages offer partition operations that just split the iterator into two iterators, instead of building two collections. But this isn’t a good fit for Rust: items drawn from the underlying iterator but not yet drawn from the appropriate partitioned iterator would need to be buffered somewhere; you would end up building a collection of some sort internally, anyway.
for_each and try_for_each
The for_each method simply applies a closure to each item.
| |
| |
打印输出:
| |
If your closure needs to be fallible or exit early, you can use try_for_each.
| |
Implementing Your Own Iterators
| |
| |
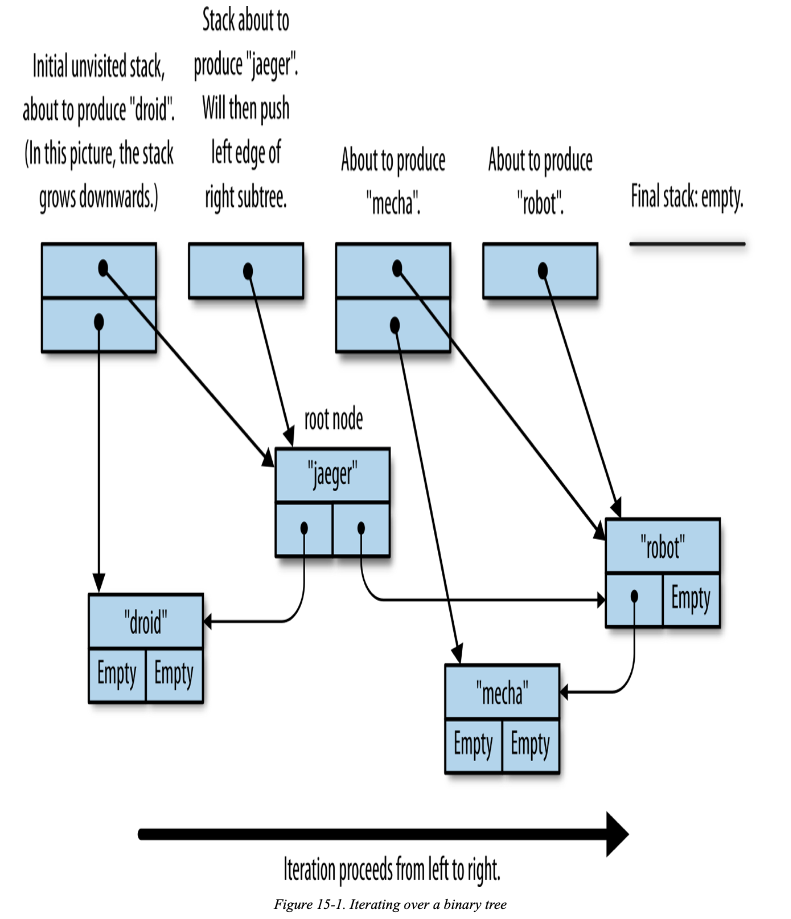
Chapter 19. Concurrency
惯用的多线程代码写法:
- 一个后台线程只负责一件事,而且周期性“醒来”去做这件事。
- 通用线程池通过任务队列与客户端通信。
- 管道将数据从一个线程导入到另一个线程,每个线程只做一小部分工作。
- 数据并行假设(不管正确与否)整个计算机主要用于一项大型计算,这个大型计算进而又拆分成n个小任务,在n个线程上执行,希望所有n个机器的核心同时工作。
- 同步对象海中多个线程拥有同一个数据权限,使用基于互斥量等低级原语的临时锁方案避免争用。
- 原子整数操作允许多核心通过一个机器字大小的字段传递信息而实现通信。(除非要交换的数据就是整数值,否则这种方法比其他手段更难以保证正确。这通常意味着传递指针。)
Fork-Join Parallelism
Fork-join parallelism 有如下优点:
- 非常简单。
- 避免瓶颈。
- 性能计算直观。
- 容易推断程序是否正确。
Fork-join 的主要缺点是要求工作单元隔离。
spawn and join
std::thread::spawn 创建一个新的线程:
| |
它接收一个参数,一个 FnOnce 闭包或者函数。
用 spawn 来实现前面的 process_file 函数的并行版:
| |
spawn 函数定义:
| |
因此 thread::spawn(move || process_files(worklist)) 会返回 JoinHandle ,并将它们放进一个 vector 中。
Error Handling Across Threads
| |
这个.join()方法做了两件事情。
首先,handle.join()返回一个 std::thread::Result。
其次,handle.join() 把子线程返回的值传给了父线程。handle.join() 返回的完整类型是std::thread::Result<std::io::Result<()>>。其中thread::Result 是 spawn/join API的一部分,而 io::Result 是我们应用的相关类型。
在Rust中,错误是一种 Result 值(数据)而不是异常(控制流)。可以像任何值一样跨线程传送它们。
Sharing Immutable Data Across Threads
| |
如果像之前那样传进线程会报错。
| |
会抱怨 spawn 中闭包的生命周期不是 'static。spawn 会启动一个独立的线程。Rust无法知道一个子线程会允许多长时间,因此它假设一种最坏的情况,即子线程可能会在父线程已经完成且父线程中所有的值都消失之后继续运行。
可以使用 Arc 来解决这个问题:
| |
调用glossary.clone()后,会创建Arc智能指针而不是整个 GigabyteMap 的一个副本。这相当于增加一次引用计数。
这样修改之后,程序就可以编译通过并运行了。因为它不再依赖引用的生命周期。只要有任何线程拥有 Arc<GigabyteMap> ,映射就不会释放,即使父线程早就退出了。因为 Arc 中的数据是不可修改的,所以也不会出现任何数据争用。
Rayon
Rayon 库:
| |
rayon::join(fn1, fn2) 就是调用两个函数并返回两个结果。而.par_iter() 方法会创建一个 ParallelIterator ,这个值有 map、filter和其他方法,非常类似于Rust的Iterator。
下图展示了两种理解 giant_vector.par_iter().for_each(...) 调用的方式。(a) 表面上看,Rayon会为向量中的每个元素都启动一个线程。(b)在后台,Rayon会让每个工作线程对应一个CPU核心,这样效率更高。这个工作线程池由程序的所有线程共享。在同时数千个任务时,Rayon会自动拆分工作。
用Rayon写process_files_in_parallel。
| |
First, we use filenames.par_iter() to create a parallel iterator.
.map()对每个文件名调用process_file。这样会得到io::Result<()>值的一个 ParallelIterator。然后用 .reduce_with() 组合结果。在这里,我们保留第一个错误(如果有的话),然后丢弃其他错误。
The .reduce_with() method is also handy when you pass a .map() closure that returns a useful value on success. Then you can pass .reduce_with() a closure that knows how to combine two success results.
reduce_with returns an Option that is None only if filenames was empty. We use the Option’s .unwrap_or() method to make the result Ok(()) in that case.
Channels
A channel is a one-way conduit for sending values from one thread to another. In other words, it’s a thread-safe queue.

图片中应该有误,下面一个线程应该是 thread 2。
Rust channels are faster than Unix pipes. Sending a value moves it rather than copying it, and moves are fast even when you’re moving data structures that contain many megabytes of data.
Sending Values
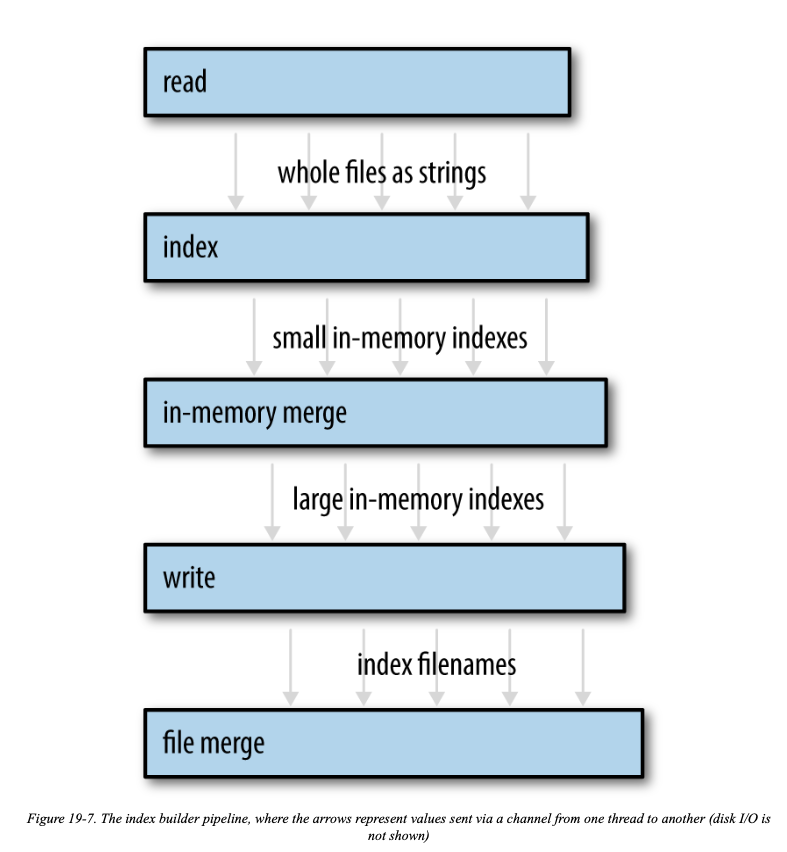
The code to start our file-reading thread looks like this:
| |
Whether text contains 10 lines of text or 10 megabytes, this operation copies three machine words (the size of a String struct), and the corresponding receiver.recv() call will also copy three machine words.
The send and recv methods both return Results, but these methods fail only if the other end of the channel has been dropped.
In our code, sender.send(text) will fail only if the receiver’s thread has exited early. This is typical for code that uses channels. Whether that happened deliberately or due to an error, it’s OK for our reader thread to quietly shut itself down.
| |
Receiving Values
| |
等价于
| |
The loop will exit normally when the channel is empty and the Sender has been dropped.
| |
Running the Pipeline
Stage3:
| |
Stage 4:
| |
Stage 5:
| |
最终运行代码:
| |
Channel Features and Performance
std::sync::mpsc 就是 “multiproducer, single-consumer”。
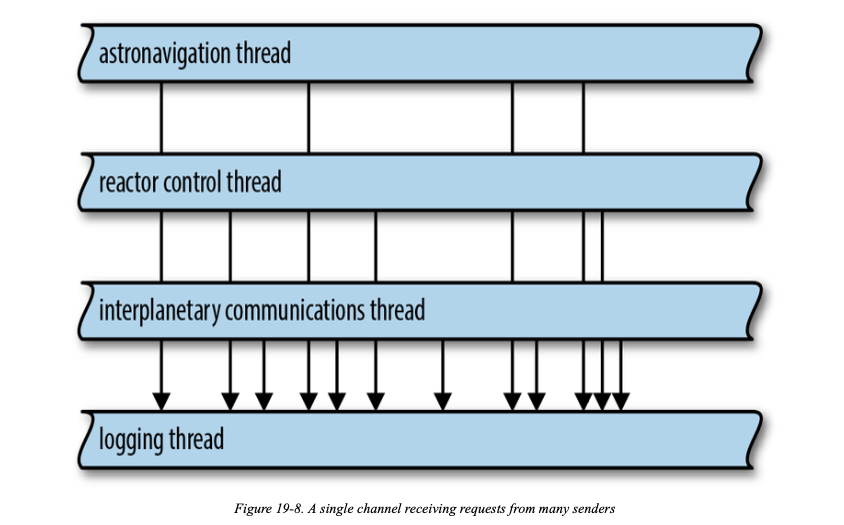
Sender<T> implements the Clone trait. To get a channel with multiple senders, simply create a regular channel and clone the sender as many times as you like. You can move each Sender value to a different thread.
A Receiver<T> can’t be cloned, so if you need to have multiple threads receiving values from the same channel, you need a Mutex.
Rust通道是经过认真优化的。在刚创建通道时,Rust使用“一次性”队列实现。如果只是用这个通道发送一个对象,那可以保证开销最小。如果再发送第二个值,Rust则会切换到一个不同的队列实现。这个实现会从长远考虑,准备让通道传输很多值,同时又保持分配开销最小化。如果你选择克隆 Sender ,Rust则必须回退到另外一个实现,该实现可以保证多个线程同时发送值时的安全。不过即使是这3个实现中最慢的实现也是没有锁的队列,因此发送和接收值最多只是几个原子操作,涉及一次堆内存分配,外加转移自身。只有在队列为空且接收线程需要休眠时才需要系统调用。当然,此时经过通道的流量无论如何也不是最大的。
发送至的速度超过接收和处理值的速度。这会导致通道内部的值越积越多。Rust借用Unix管道。Unix使用 backpressure ,从而强迫快速发送端放慢速度。Unix系统的每个管道都有固定大小,如果一个进程尝试向随时可能满的管道写入数据,系统就会直接阻塞该进程,直至管道中有了空间。Rust中的等价机制加 synchronous channel:
| |
同步通道就像常规通道一样,只是在创建时需要指定它可以保存多少值。对于同步通道而言,sender.send(value) 是一个潜在的阻塞操作。
Thread Safety: Send and Sync
This is mostly true, but Rust’s full thread safety story hinges on two built-in traits, std::marker::Send and std::marker::Sync.
- Types that implement
Sendare safe to pass by value to another thread. They can be moved across threads. - Types that implement
Syncare safe to pass by non-mut reference to another thread. They can be shared across threads.
By safe here, we mean the same thing we always mean: free from data races and other undefined behavior.
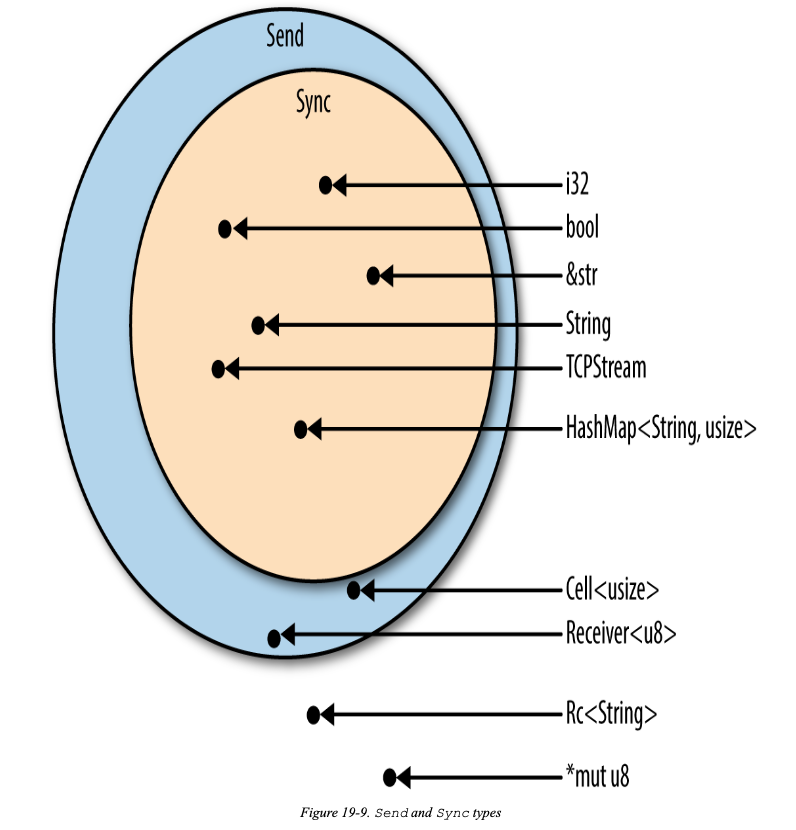
The few types that are neither Send nor Sync are mostly those that use mutability in a way that isn’t thread-safe. For example, consider std::rc::Rc<T>, the type of reference-counting smart pointers.
Piping Almost Any Iterator to a Channel
统一迭代器管道和线程管道。
| |
可以定义一个 trait。
| |
然后为这个迭代器实现这个 trait。
| |
Beyond Pipelines
通道不仅在管道中有用,它们也是在相同进程中为其他线程提供异步服务的快速而简单的方式。
通道也适用于一个线程向另一个线程发送请求并期待得到某种响应的情形。
Shared Mutable State
What Is a Mutex?
互斥量(或者叫锁)用于强制多线程依次访问特定的数据。
互斥量保护数据。互斥量的作用体现在以下几方面。
- 防止 data races,即避免多个线程并发读写同一块内存。
- 即使没有数据争用,即使所有读写在程序中都是顺序执行,如果没有互斥量,不同线程的操作也可能以任意方式相互交错。
- 互斥量支持通过 invariant 编程,即受保护数据由你负责初始化但每个临界区来维护的规则。
Mutex<T>
因为等待列表既是共享的也是可修改的,所以必须由一个 Mutex 来提供保护:
| |
创建 Mutex 代码:
| |
创建一个新的 Mutex 就像创建一个新 Box 或 Arc,但 Box 和 Arc 都意味着堆分配,而 Mutex 就是单纯的一种锁。如果想把 Mutex 分配在堆上,则必须明确地表示出来,就像这里使用 Arc::new 创建整个应用,而使用 Mutex::new 只是为了保护数据一样。这两个类型经常一块使用, Arc 方便跨线程共享数据,而 Mutex 方便跨线程共享可修改数据。
使用 Mutex :
| |
取得数据的唯一方法是调用 .lock() 方法:
| |
self.waiting_list.lock() 会一直阻塞到可以再次获得互斥量。这个方法调用返回的 MutexGuard<WaitingList> 值是对 &mut WaitingList 的一个简单封装。借助 Deref 类型转换,可以直接在这个 guard 上调用 WaitingList 方法:
| |
这个 guard 甚至还允许我们直接引用底层数据。Rust的生命周期系统保证这些引用的寿命比不会超出 guard 自身。如果没有拿到锁,则不可能在 Mutex 中访问数据。
在 guard 被清除后,锁也会被释放。通常这会在阻塞结束时发生,但也可以手工清除:
| |
mut and Mutex
在Rust中,&mut 意味着 exclusive access。Plain & means shared access.
But Mutex does have a way: the lock. In fact, a mutex is little more than a way to do exactly this, to provide exclusive (mut) access to the data inside, even though many threads may have shared (non-mut) access to the Mutex itself.
Rust’s type system is telling us what Mutex does. It dynamically enforces exclusive access, something that’s usually done statically, at compile time, by the Rust compiler.
(You may recall that std::cell::RefCell does the same, except without trying to support multiple threads. Mutex and RefCell are both flavors of interior mutability, which we covered .)
Why Mutexes Are Not Always a Good Idea
However, threads that use mutexes are subject to some other problems that Rust doesn’t fix for you:
- Valid Rust programs can’t have data races, but they can still have other race conditions— situations where a program’s behavior depends on timing among threads and may therefore vary from run to run. Some race conditions are benign. Some manifest as general flakiness and incredibly hard-to-fix bugs. Using mutexes in an unstructured way invites race conditions. It’s up to you to make sure they’re benign.
- Shared mutable state also affects program design. Where channels serve as an abstraction boundary in your code, making it easy to separate isolated components for testing, mutexes encourage a “just-add-a-method” way of working that can lead to a monolithic blob of interrelated code.
- Lastly, mutexes are just not as simple as they seem at first, as the next two sections will show.
All of these problems are inherent in the tools. Use a more structured approach when you can; use a Mutex when you must.
Deadlock
| |
Suppose the first call to self.waiting_list.lock() succeeds, taking the lock. The second call sees that the lock is held, so it blocks, waiting for it to be released. It will be waiting forever. The waiting thread is the one that’s holding the lock.
To put it another way, the lock in a Mutex is not a recursive lock.
Rust’s borrow system can’t protect you from deadlock. The best protection is to keep critical sections small: get in, do your work, and get out.
It’s also possible to get deadlock with channels.
Poisoned Mutexes
If a thread panics while holding a Mutex, Rust marks the Mutex as poisoned. Any subsequent attempt to lock the poisoned Mutex will get an error result. Our .unwrap() call tells Rust to panic if that happens, propagating panic from the other thread to this one.
Multiconsumer Channels Using Mutexes
| |
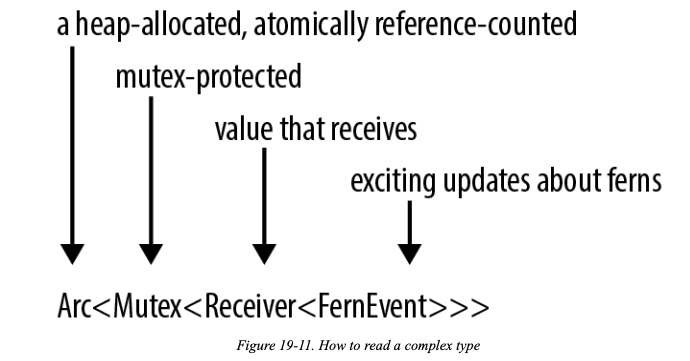
Read/Write Locks(RwLock<T>)
Whereas a mutex has a single lock method, a read/write lock has two locking methods, read and write. The RwLock::write method is like Mutex::lock. It waits for exclusive, mut access to the protected data. The RwLock::read method provides non-mut access, with the advantage that it is less likely to have to wait, because many threads can safely read at once. With a mutex, at any given moment, the protected data has only one reader or writer (or none). With a read/write lock, it can have either one writer or many readers, much like Rust references generally.
Condition Variables (Condvar)
In Rust, the std::sync::Condvar type implements condition variables. A Condvar has methods .wait() and .notify_all(); .wait() blocks until some other thread calls .notify_all().
Atomics
The std::sync::atomic module contains atomic types for lock-free concurrent programming. These types are basically the same as Standard C++ atomics, with some extras:
AtomicIsize and AtomicUsize are shared integer types corresponding to the single- threaded isize and usize types.
AtomicI8, AtomicI16, AtomicI32, AtomicI64, and their unsigned variants like AtomicU8 are shared integer types that correspond to the single-threaded types i8, i16, etc.
An AtomicBool is a shared bool value.
An AtomicPtr<T> is a shared value of the unsafe pointer type *mut T.
Global Variables
The simplest way to support incrementing PACKETS_SERVED, while keeping it thread-safe, is to make it an atomic integer:
| |
Once this static is declared, incrementing the packet count is straightforward:
| |
Atomic globals are limited to simple integers and Booleans. Still, creating a global variable of any other type amounts to solving two problems.
First, the variable must be made thread-safe somehow, because otherwise it can’t be global: for safety, static variables must be both Sync and non-mut. Fortunately, we’ve already seen the solution for this problem. Rust has types for safely sharing values that change: Mutex, RwLock, and the atomic types. These types can be modified even when declared as non-mut. It’s what they do. (See “mut and Mutex”.)
Second, static initializers can only call functions specifically marked as const, which the compiler can evaluate during compile time. Put another way, their output is deterministic; it depends only on their arguments, not any other state or I/O. That way, the compiler can embed the results of that computation as a compile-time constant. This is similar to C++ constexpr.
Rust limits what const functions can do to a small set of operations, which are enough to be useful while still not allowing any nondeterministic results. const functions can’t take types as generic arguments, only lifetimes, and it’s not possible to allocate memory or operate on raw pointers, even in unsafe blocks. We can, however, use arithmetic operations (including wrapping and saturating arithmetic), logical operations that don’t short-circuit, and other const functions. For example, we can create convenience functions to make defining statics and consts easier and reduce code duplication:
| |
Combining these techniques, we might be tempted to write:
| |
Unfortunately, while AtomicUsize::new() and String::new() are const fn, Mutex::new() is not. In order to get around these limitations, we need to use the lazy_static crate.
We can declare a global Mutex-controlled HashMap with lazy_static like this:
| |
Using lazy_static! imposes a tiny performance cost on each access to the static data. The implementation uses std::sync::Once, a low-level synchronization primitive designed for one-time initialization. Behind the scenes, each time a lazy static is accessed, the program executes an atomic load instruction to check that initialization has already occurred. (Once is rather special purpose, so we will not cover it in detail here. It is usually more convenient to use lazy_static! instead. However, it is handy for initializing non-Rust libraries; for an example, see “A Safe Interface to libgit2”.)
What Hacking Concurrent Code in Rust Is Like
Rust insists on safety, so from the moment you decide to write a multithreaded program, the focus is on building safe, structured communication. Keeping threads mostly isolated is a good way to convince Rust that what you’re doing is safe. It happens that isolation is also a good way to make sure what you’re doing is correct and maintainable. Again, Rust guides you toward good programs.
Chapter 20. Asynchronous Programming
Asynchronous tasks are similar to threads, but are much quicker to create, pass control amongst themselves more efficiently, and have memory overhead an order of magnitude less than that of a thread.
From Synchronous to Asynchronous
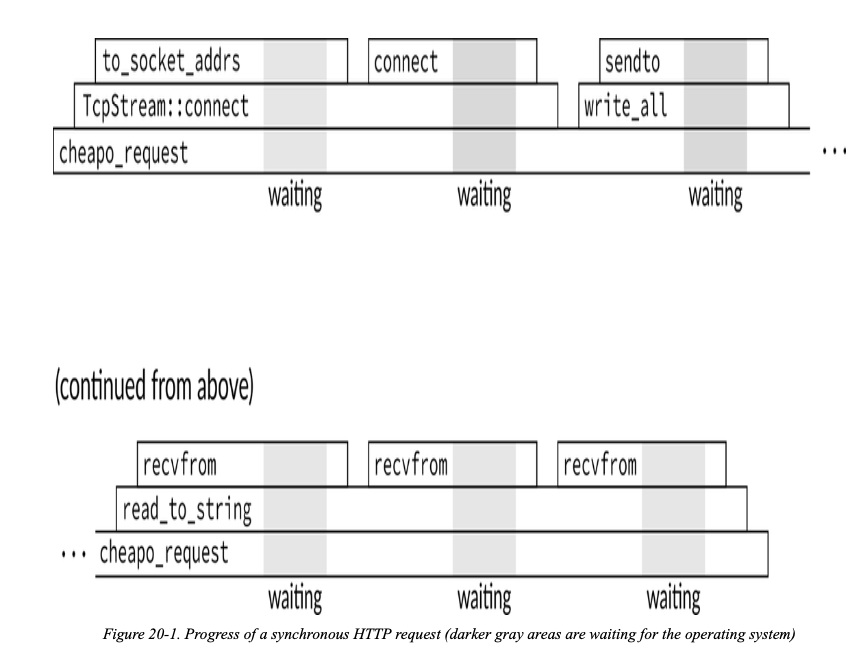
文中举了同步的获得HTTP请求再返回的例子,可以看到大部分时间都花在等待上了。
Futures
std::future::Future
| |
| |
A Future represents an operation that you can test for completion. A future’s poll method never waits for the operation to finish: it always returns immediately. If the operation is complete, poll returns Poll::Ready(output), where output is its final result. Otherwise, it returns Pending. If and when the future is worth polling again, it promises to let us know by invoking a waker, a callback function supplied in the Context. We call this the “piñata model” of asynchronous programming: the only thing you can do with a future is whack it with a poll until a value falls out.
Chapter 21. Macros
在编译期间,在类型检查和机器码生成之前,宏会进行展开。联系rust编译过程图理解。
Macro Basics
- 用
macro_rules!定义的声明宏,通过模式匹配来工作。 - 在 pattern 或者 template 中,可以用方括号或者花括号代替圆括号。它们没有什么区别。
| |
- 对于宏的调用也是一样的。按照惯例,调用
assert_eq!用圆括号,调用vec!用方括号,对于macro_rules!用花括号。
Basics of Macro Expansion
- 在编译期间,Rust展开宏非常早。在宏定义之前是不能调用它的,因为Rust会展开每一个宏调用,这发生在查看程序剩余代码之前。
- 正则表达式是在字符集上操作,而 pattern 是在 token 上操作。正则表达式和宏模式另一个重要的区别是在Rust中圆括号、块总是成对出现的。在宏展开之前就会进行检查。
- 注解和空白不是 token ,所以不会影响模式匹配。
- 一般可能会有一些错误,在参数部分用
$left:expr而不是$left。Rust不会立刻发现这个错误,它会将$left当作一个替换,直到调用这个宏的时候会发生错误。
Unintended Consenquences
正确的 assert_eq! 宏的定义是这样的:
| |
为什么不这样写呢?
| |
如果 assert_eq!(letters.pop(), Some('z')) 这样调用,由于 letters.pop() 会从一个 vector 中移除一个值,那么当第二次调用的时候就会产生一个不同的值,这也就是为什么实际宏当中 $left 和 $right 只会保存一次它们的值。
那为什么宏里面要用引用,不能这样写吗?
| |
如果传入的参数是 String ,那么就会移动所有权到变量里面。因此这里要使用引用。
In short, macros can do surprising things.
Repetition
标准库中 vec! 宏
| |
$( PATTERN ), *用来匹配任何用,分隔的立标,在列表中每个匹配一个PATTERN。
| Pattern | Meaning |
|---|---|
| $( … )* | Match 0 or more times with no separator |
| $( … ),* | Match 0 or more times, separated by commas |
| $( … );* | Match 0 or more times, separated by semicolons |
| $( … )+ | Match 1 or more times with no separator |
| $( … ),+ | Match 1 or more times, separated by commas |
| $( … );+ | Match 1 or more times, separated by semicolons |
| $( … )? | Match 0 or 1 times with no separator |
| $( … ),? | Match 0 or 1 times, separated by commas |
| $( … );? | Match 0 or 1 times, separated by semicolons |
总结一下啦:
*匹配0次或多次+至少匹配一次?最多匹配一次
理解理解这个复杂的鬼东西
| |
- 创建一个 boxed 数组然后用
[T]::into_vec方法将 boxed 数组转换成一个 vector 。 <[_]>是一个非常规的写法,用来表示一些类型的切片(“slice of something”)。像fn(),&str,或者[_],没有明确的类型,就必须包在尖括号<>里面。
Built-In Macros
下面的这些宏是内置的,硬编码在 rustc 中。
file!(),line!(),column!()stringingfy!(...tokens...)concat!(str0, str1, ...)