最近又把自己的博客折腾了一遍,之前用的是vuepress搭建的,奈何实在看不惯字体太小,配置字体大小半天不成功,索性想着重新搭建一下。网上搜索到的主要有hexo和hugo,之前尝试过hexo,没有很满意,这次就试着用hugo搭建。
安装Hugo
接着运行:
显示正常则说明安装成功。
创建Hugo网站
1
| hugo new site hugo-blog
|
运行效果如下:
 1
 2
 3
 4
 5
 6
 7
 8
 9
10
11
12
13
| jinjin@Mac-mini test % hugo new site hugo-blog
Congratulations! Your new Hugo site is created in /Users/jinjin/code/test/hugo-blog.
Just a few more steps and you're ready to go:
1. Download a theme into the same-named folder.
Choose a theme from https://themes.gohugo.io/ or
create your own with the "hugo new theme <THEMENAME>" command.
2. Perhaps you want to add some content. You can add single files
with "hugo new <SECTIONNAME>/<FILENAME>.<FORMAT>".
3. Start the built-in live server via "hugo server".
Visit https://gohugo.io/ for quickstart guide and full documentation.
|
选择主题
在官方网站主题板块选择一个喜欢的主题,我选择的是Clean White,接着可以按照主题给的教程进行安装。为了后续方便github管理部署以及修改主题,将原主题仓库fork到自己的账户,用git submodule方式进行仓库链接。
首先找到主题的github仓库,然后fork下来,接着在本地使用git submodule命令,这里仓库地址已经变成自己账户下主题仓库的地址了。
1
| git submodule add https://github.com/wenjin1997/hugo-theme-cleanwhite.git themes/hugo-theme-cleanwhite
|
在这个过程中,运行git submodule与git clone遇到了一些问题。
参考Failed to connect to github.com port 443: Operation timed out解决该问题,访问https://ping.chinaz.com/github.com,找到一个可用的ip地址,例如为140.82.121.4。
1
2
| cd ~
sudo vim /etc/hosts
|
在host文件中进行修改。
 1
 2
 3
 4
 5
 6
 7
 8
 9
10
11
| ##
# Host Database
#
# localhost is used to configure the loopback interface
# when the system is booting. Do not change this entry.
##
127.0.0.1 localhost
255.255.255.255 broadcasthost
::1 localhost
140.82.121.4 github.com
|
解决HTTP/2 stream 1 was not closed cleanly before end of the underlying stream
之后使用git clone又出现如下错误:
1
2
3
| jinjin@Mac-mini themes % git clone https://github.com/zhaohuabing/hugo-theme-cleanwhite.git
Cloning into 'hugo-theme-cleanwhite'...
fatal: unable to access 'https://github.com/zhaohuabing/hugo-theme-cleanwhite.git/': HTTP/2 stream 1 was not closed cleanly before end of the underlying stream
|
参考解决 HTTP/2 stream 1 was not closed cleanly before end of the underlying stream,需要对git进行全局配置。
1
| git config --global http.version HTTP/1.1
|
初始化主题配置及发布
1
2
| cd themes
cp -r hugo-theme-cleanwhite/exampleSite/** ../
|
接着运行hugo server在本地http://localhost:1313/就能看到博客的样子了。
1
2
3
4
5
6
7
8
9
10
11
12
13
14
15
16
17
18
19
20
21
22
23
24
| jinjin@Mac-mini hugo-blog % hugo server
Start building sites …
hugo v0.101.0+extended darwin/arm64 BuildDate=unknown
| EN
-------------------+-----
Pages | 71
Paginator pages | 8
Non-page files | 0
Static files | 70
Processed images | 0
Aliases | 17
Sitemaps | 1
Cleaned | 0
Built in 82 ms
Watching for changes in /Users/jinjin/code/hugo-blog/{archetypes,content,data,layouts,static,themes}
Watching for config changes in /Users/jinjin/code/hugo-blog/config.toml
Environment: "development"
Serving pages from memory
Running in Fast Render Mode. For full rebuilds on change: hugo server --disableFastRender
Web Server is available at http://localhost:1313/ (bind address 127.0.0.1)
Press Ctrl+C to stop
^C%
|
修改配置
可以边修改博客边在本地预览效果,这里有一个很重要的修改,就是在根目录下的congig.toml文件中将baseurl修改为自己的博客地址。
1
| baseurl = "https://wenjin1997.github.io"
|
GitHub Pages发布博客
首先要在github上创建自己<账户名>.github.io的仓库。
手动发布
Hugo生成的静态页面会放在public文件夹下。
接着向远程推送我们的git仓库。
1
2
3
4
5
| git init
git remote add origin git@github.com:wenjin1997/wenjin1997.github.io
git add .
git commit -m "add test"
git push origin master
|
如果在添加远程仓库时出现错误,参考Git 提示fatal: remote origin already exists 错误解决办法解决方法,用下面的命令删除远程git仓库:
接着再用git remote add origin git@github.com:wenjin1997/wenjin1997.github.io重新添加远程仓库。
运行效果如下:
 1
 2
 3
 4
 5
 6
 7
 8
 9
10
11
12
13
14
15
16
17
18
19
20
21
22
23
24
25
26
27
28
29
30
31
32
| jinjin@Mac-mini hugo-blog % cd public
jinjin@Mac-mini public % git init
hint: Using 'master' as the name for the initial branch. This default branch name
hint: is subject to change. To configure the initial branch name to use in all
hint: of your new repositories, which will suppress this warning, call:
hint:
hint: git config --global init.defaultBranch <name>
hint:
hint: Names commonly chosen instead of 'master' are 'main', 'trunk' and
hint: 'development'. The just-created branch can be renamed via this command:
hint:
hint: git branch -m <name>
Initialized empty Git repository in /Users/jinjin/code/hugo-blog/public/.git/
jinjin@Mac-mini public % git remote add origin git@github.com:wenjin1997/wenjin1997.github.io
jinjin@Mac-mini public % git add .
jinjin@Mac-mini public % git commit -m "add test"
[master (root-commit) af5a609] add test
165 files changed, 60905 insertions(+)
create mode 100644 2017/11/03/hello-world/index.html
create mode 100644 2017/11/04/istio-install_and_example/index.html
create mode 100644 2017/11/07/istio-traffic-shifting/index.html
...(省略)
jinjin@Mac-mini public % git push origin master
Enumerating objects: 285, done.
Counting objects: 100% (285/285), done.
Delta compression using up to 8 threads
Compressing objects: 100% (213/213), done.
Writing objects: 100% (285/285), 3.32 MiB | 341.00 KiB/s, done.
Total 285 (delta 82), reused 0 (delta 0), pack-reused 0
remote: Resolving deltas: 100% (82/82), done.
To github.com:wenjin1997/wenjin1997.github.io
* [new branch] master -> master
|
访问自己的博客地址wenjin1997.github.io,可以看到大功告成啦!
自动发布
使用Github Action 配置自动发布博客,先要创建一个仓库,例如hugo-blog,这里放置博客的源码,包括自己的博客文章、图片等。在仓库创建.github/workflows/deploy.yml文件,配置如下:
1
2
3
4
5
6
7
8
9
10
11
12
13
14
15
16
17
18
19
20
21
22
23
24
25
26
27
28
29
30
31
32
33
34
35
| name: deploy
on:
push:
workflow_dispatch:
schedule:
# Runs everyday at 8:00 AM
- cron: "0 0 * * *"
jobs:
build:
runs-on: ubuntu-latest
steps:
- name: Checkout
uses: actions/checkout@v2
with:
submodules: true
fetch-depth: 0
- name: Setup Hugo
uses: peaceiris/actions-hugo@v2
with:
hugo-version: "latest"
- name: Build Web
run: hugo
- name: Deploy Web
uses: peaceiris/actions-gh-pages@v3
with:
PERSONAL_TOKEN: ${{ secrets.PERSONAL_TOKEN }}
EXTERNAL_REPOSITORY: wenjin1997/wenjin1997.github.io
PUBLISH_BRANCH: master
PUBLISH_DIR: ./public
commit_message: ${{ github.event.head_commit.message }}
|
注意要修改 EXTERNAL_REPOSITORY: wenjin1997/wenjin1997.github.io。
Checkout步骤中的with中配置的submoudles值为true可以同步博客源仓库的子模块。
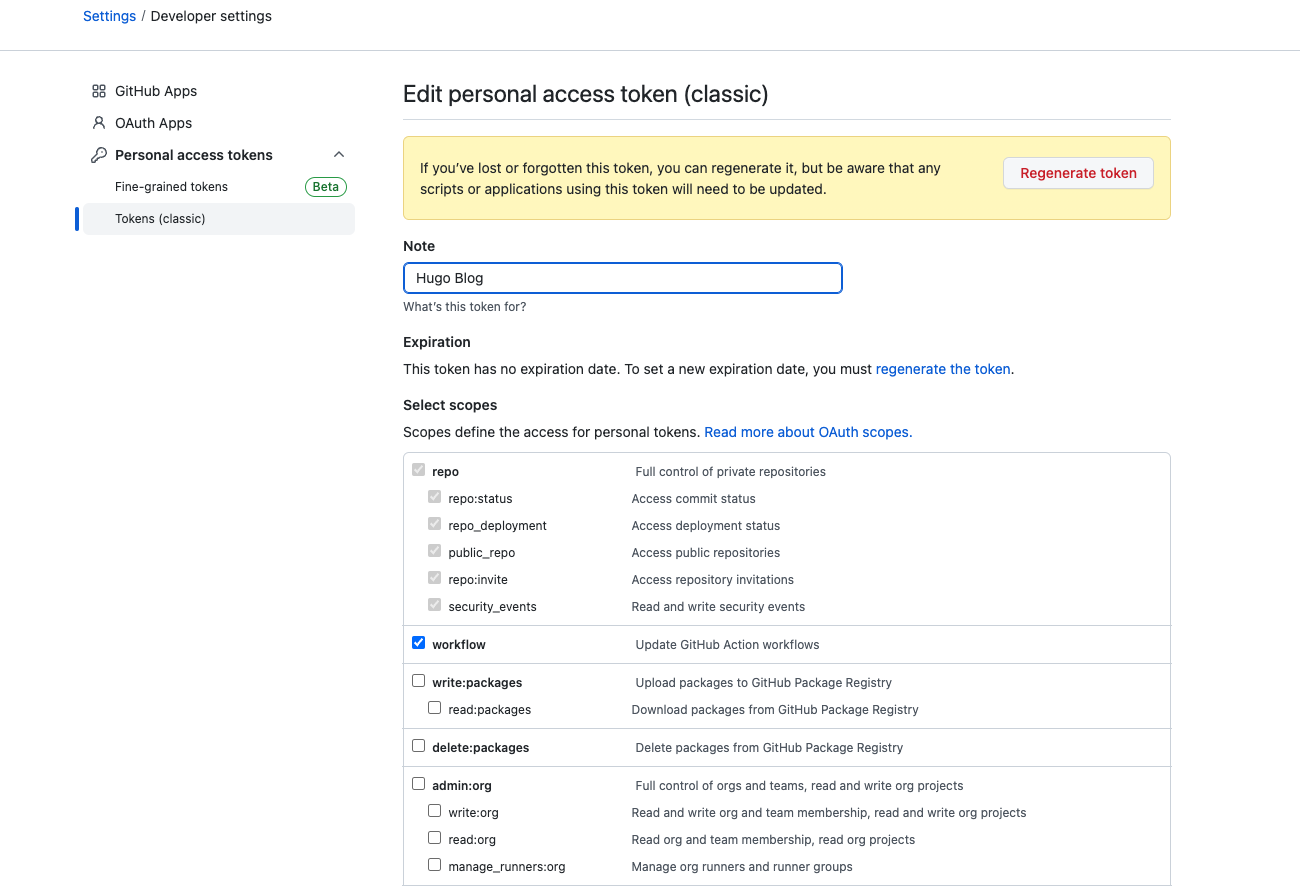
在GitHub账户下Setting - Developer settings - Personal access tokens - Tkens(classic)创建一个Token。
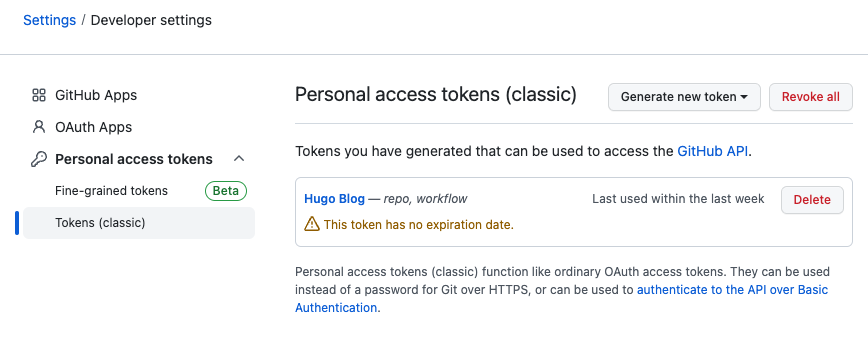
权限开启repo和workflow。
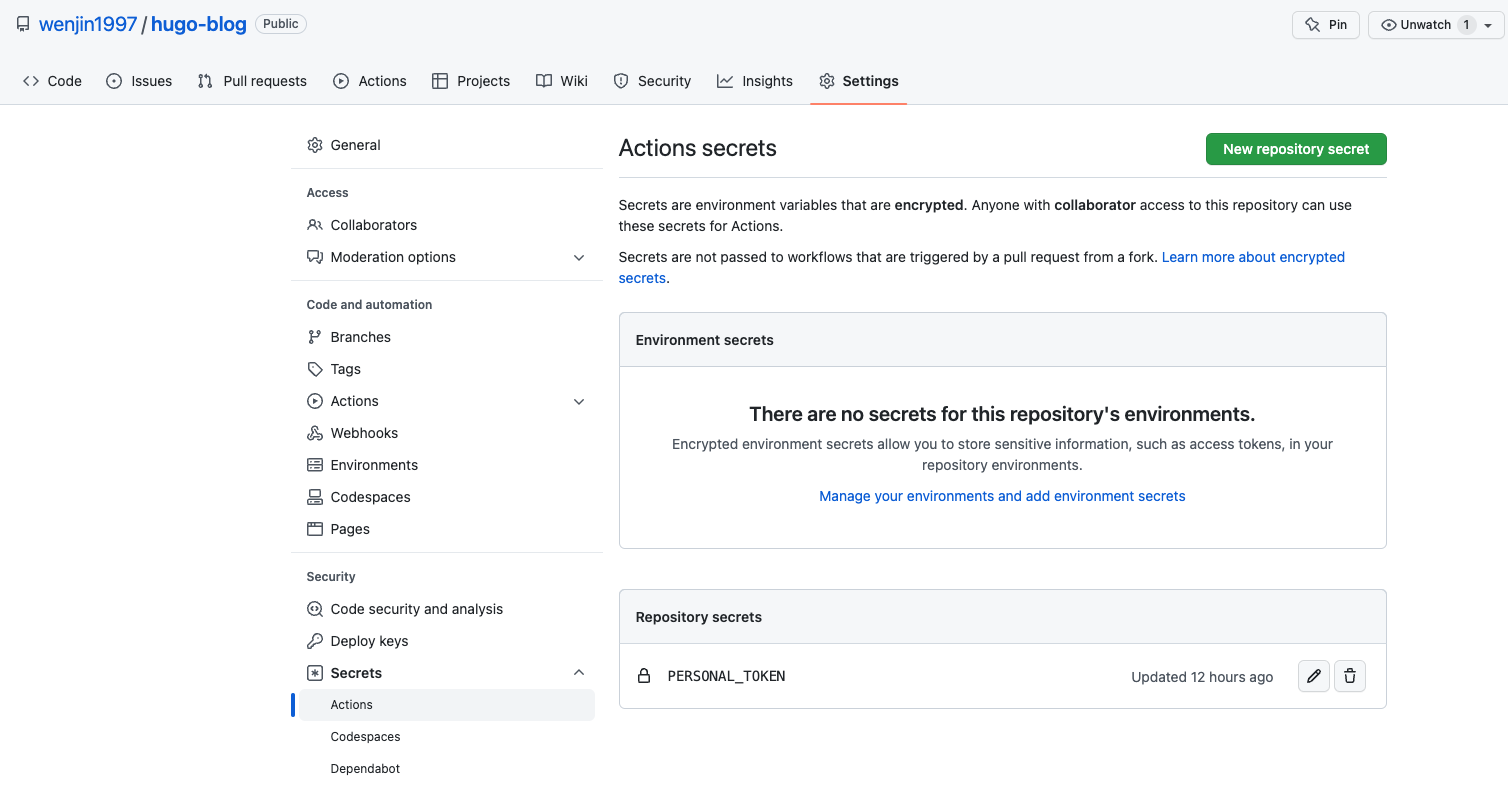
配置后复制生成的Token(只会出现一次),在刚刚创建的源仓库hugo-blog的Settings - Security - Secretes - Actions中添加PERSON_TOKEN为刚刚的Token。
完成上述配置后,本地修改博客文章,向仓库hugo-blog进行推送,可以触发GitHub Action,会自动生成博客页面并推送到GitHub Pages仓库,GitHub Pages仓库更新后,又会自动触发官方页面部署CI,实现博客发布。
博客支持数学公式
参考Hugo博客添加LaTeX语法支持,在主题文件themes/hugo-theme-clean-white/layouts/partials下创建mathjax.html,内容为:
1
2
3
4
5
6
7
8
9
10
11
12
13
14
15
16
17
18
19
20
21
22
23
24
25
26
27
28
29
30
31
32
33
34
35
| <script type="text/javascript"
async
src="https://cdn.bootcss.com/mathjax/2.7.3/MathJax.js?config=TeX-AMS-MML_HTMLorMML">
MathJax.Hub.Config({
tex2jax: {
inlineMath: [['$','$'], ['\\(','\\)']],
displayMath: [['$$','$$'], ['\[\[','\]\]']],
processEscapes: true,
processEnvironments: true,
skipTags: ['script', 'noscript', 'style', 'textarea', 'pre'],
TeX: { equationNumbers: { autoNumber: "AMS" },
extensions: ["AMSmath.js", "AMSsymbols.js"] }
}
});
MathJax.Hub.Queue(function() {
// Fix <code> tags after MathJax finishes running. This is a
// hack to overcome a shortcoming of Markdown. Discussion at
// https://github.com/mojombo/jekyll/issues/199
var all = MathJax.Hub.getAllJax(), i;
for(i = 0; i < all.length; i += 1) {
all[i].SourceElement().parentNode.className += ' has-jax';
}
});
</script>
<style>
code.has-jax {
font: inherit;
font-size: 100%;
background: inherit;
border: inherit;
color: #515151;
}
</style>
|
在themes/hugo-theme-clean-white/layouts/partials/head.html文件末尾添加下面一行代码:
1
| {{ partial "mathjax.html" . }}
|
这样在每个页面都会自动插入代码,支持数学公式了。
Tips:上面使用的是MathJax,对于LaTeX公式中的换行符,要使用\\\三个斜杠代替\\,例如
1
2
3
4
5
6
| \begin{aligned}
\begin{cases}
\frac{du}{dt}=-\frac{u}{t},1\leq t\leq 2, \\\
u(1)=1
\end{cases}
\end{aligned}
|
这样才能正常显示两行公式:
$$
\begin{aligned}
    \begin{cases}
        \frac{du}{dt}=-\frac{u}{t},1\leq t\leq 2, \\\
        u(1)=1
    \end{cases}
\end{aligned}
$$参考资料
- Hugo 官网
- Hugo + GitHub Action,搭建你的博客自动发布系统
- 如何利用 GitHub Pages 和 Hugo 轻松搭建个人博客?
- 使用 Hugo 和 GitHub Pages 搭建静态博客
- Hugo Themes: Clean White
- zhaohuabing/hugo-theme-cleanwhite
- Failed to connect to github.com port 443: Operation timed out
- 解决 HTTP/2 stream 1 was not closed cleanly before end of the underlying stream
- Git 提示fatal: remote origin already exists 错误解决办法
- Hugo博客添加LaTeX语法支持